Iris Quilts
  • Home Page
  • Galleries
  • Blog
  • Pattern & Tool Shop
  • About Janice
  • Contact Janice

FREE PATTERN FRIDAY - MAY 2017 - Panel Quilt DESIGN

5/12/2017

0 Comments

 
Hello Quilting Friends,

Here is the next offering for my special give away, Free Pattern Friday. Once a month, on a Friday, I will make a pattern available as a free PDF download. The pattern will be available until I post the next one. Then it's gone! So make sure you download your copy today.
 
You may also want to sign up for my mailing list. That way you’ll never miss an update to my blog. I promise never to sell your name to anyone. I will only ever use it to let you know about what’s going on at my website.

Picture
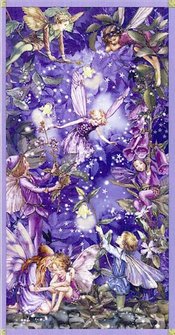
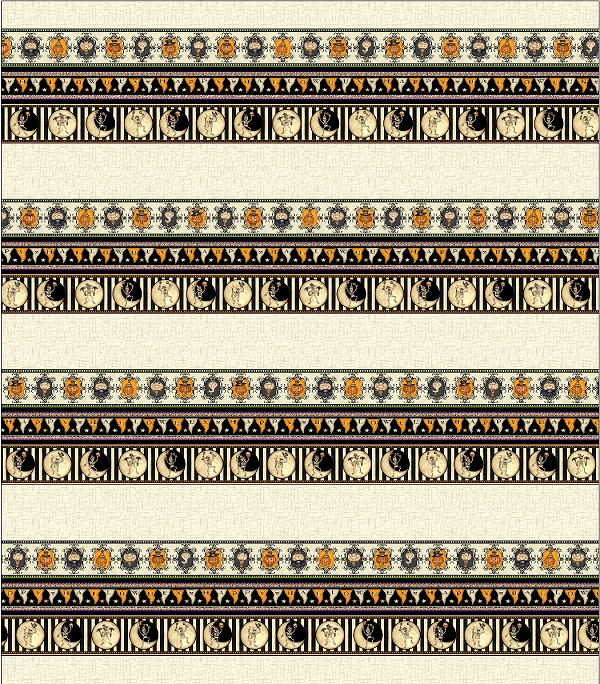
This month’s design was created to find a way to make use of a beautiful panel I bought at a quilt show. The panel features The Flower Fairies of Cicely Mary Barker (CMB). Which are fairies that represent different trees and flowers. Cicely Mary Barker first published her fairies starting in 1923. Since then they have taken on a life of their own and their popularity continues today. You can learn more about Cicely Mary Barker by visiting her Wikipedia page. If you’d like to learn more about her Flower Fairies and become a part of the online community, click here to visit the webpage.

I’ve been a fan of CMB and her Flower Fairies since I first learned about them back in the eighties. I have acquired a few collectibles featuring her fairies over the years. At some point I started to come across CMB Flower Fairies printed on quilting cotton. These were repeated prints of various motifs and scales. The Flower Fairy fabrics are printed by Michael Miller Fabrics and have a lovely coordinating blender group known as Fairy Frost. Click here to see their collections.

I also noticed the Flower Fairy panels that were being sold in my local quilt shops. I’ve been tempted to buy one but I didn’t want to deal with the challenge of finding a good design layout for using the panel. The patterns available that I had seen for using panels didn’t appeal to me for one reason or another. I can’t explain it, they just didn’t do it for me. So I knew that I would have to come up with my own design if I bought a panel, therefore I never bought one.

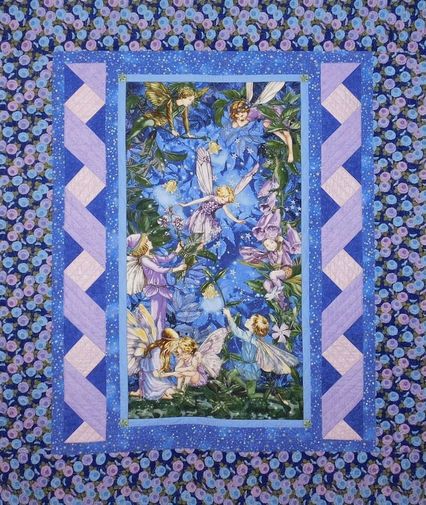
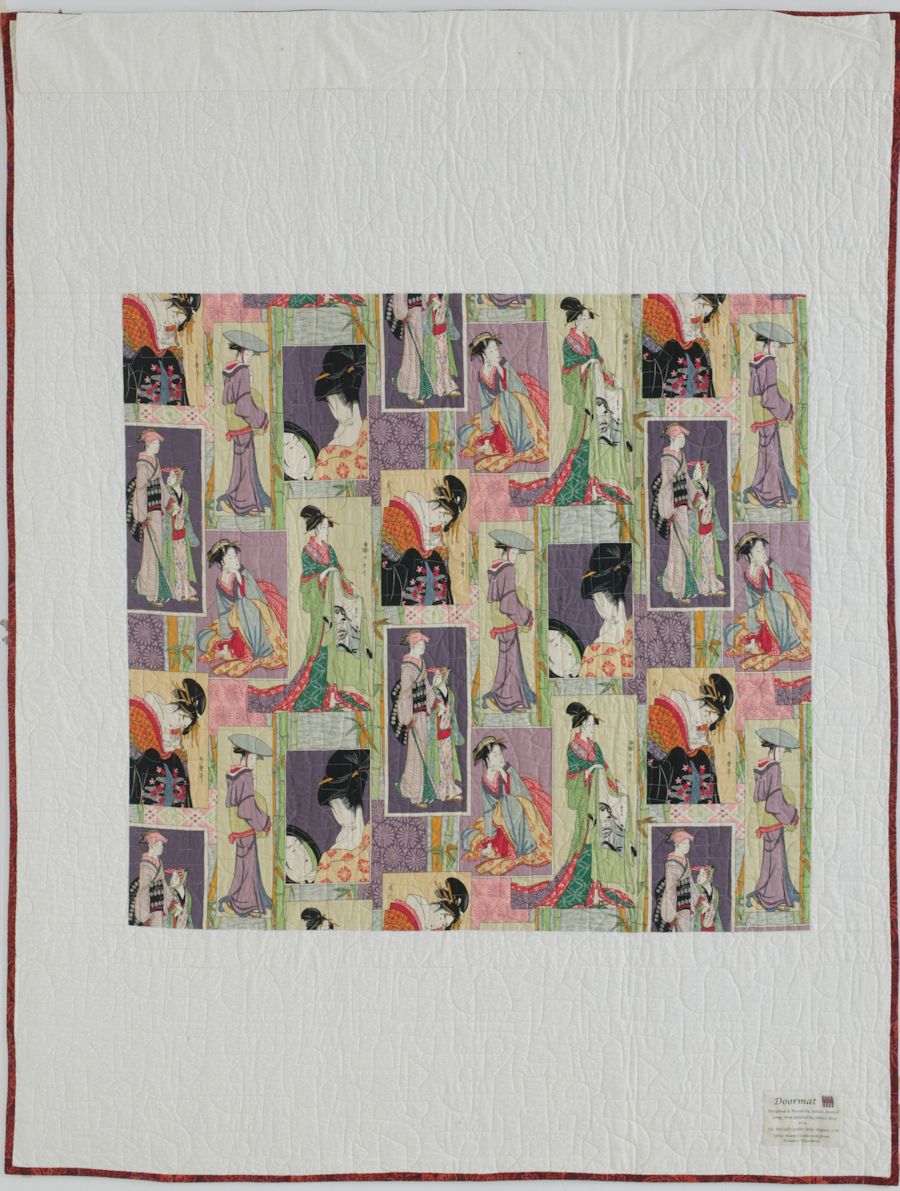
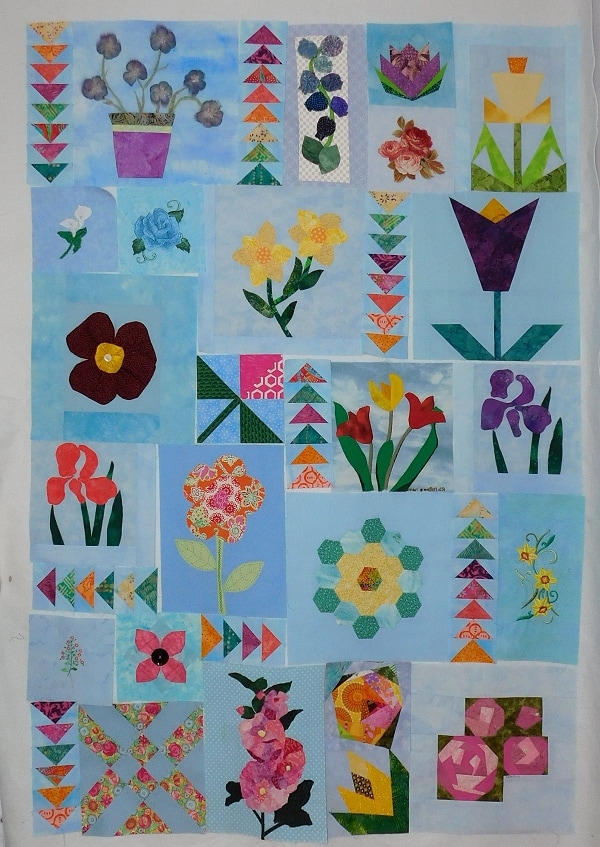
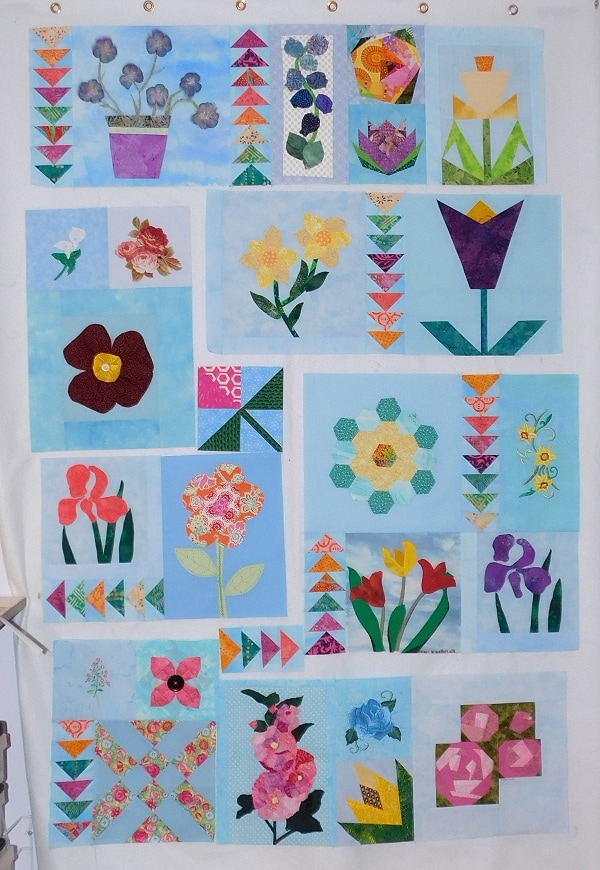
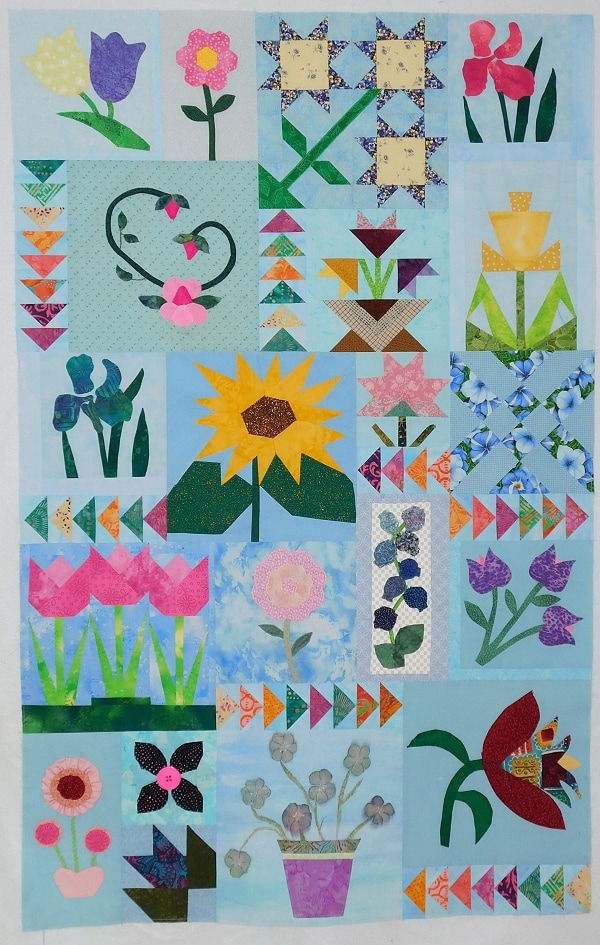
Then one day I came upon the Night Fairies. Oh be still my heart, I loved the colors and had to have it! So now I was the proud owner of a panel and had to find a nice simple yet effective design for this panel. I didn’t want to get too crazy with the extra components. So I decided to add a column of small blocks to the sides of the panel to give a bit more width.
Picture
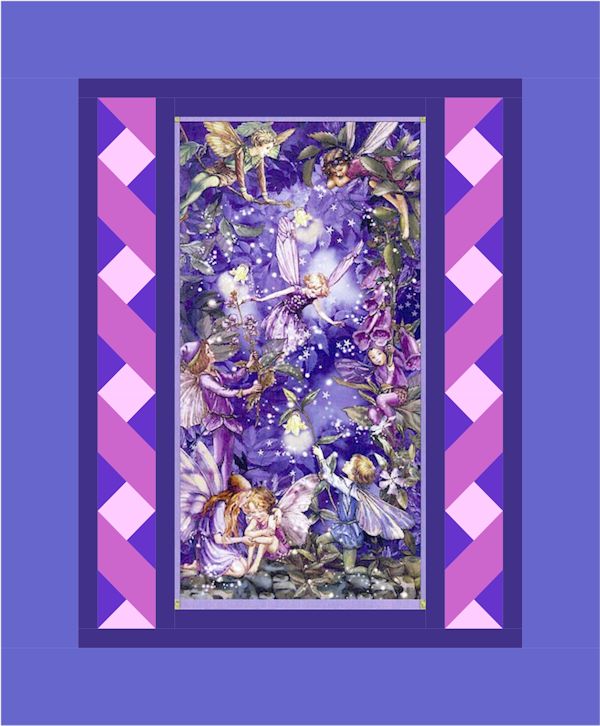
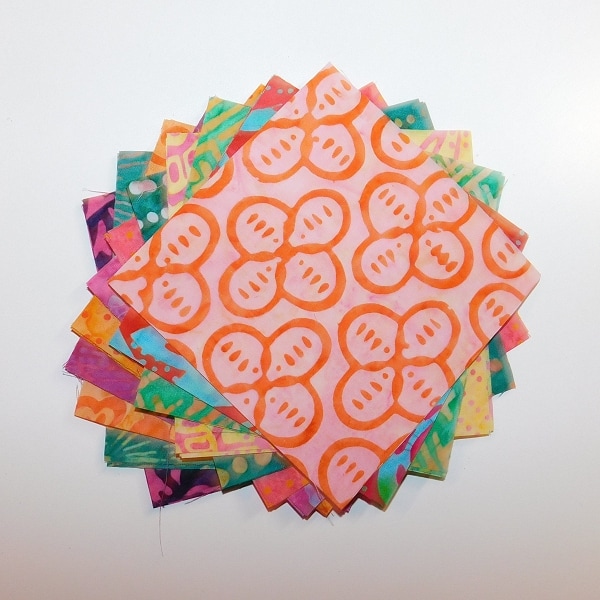
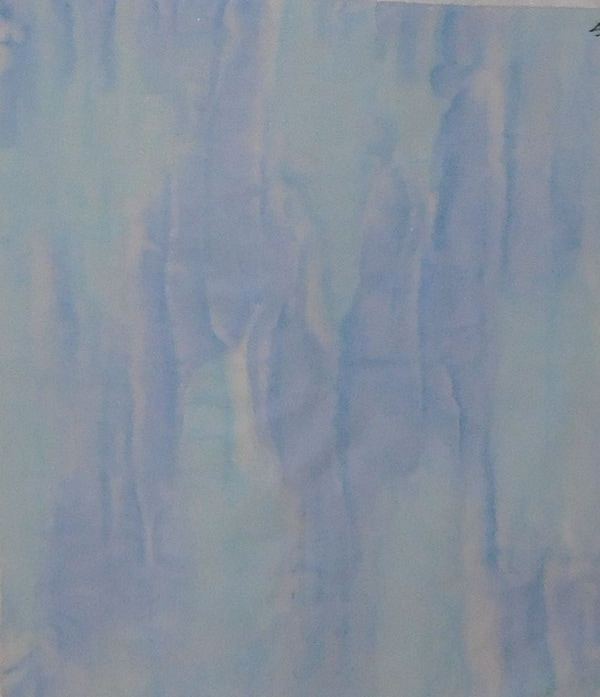
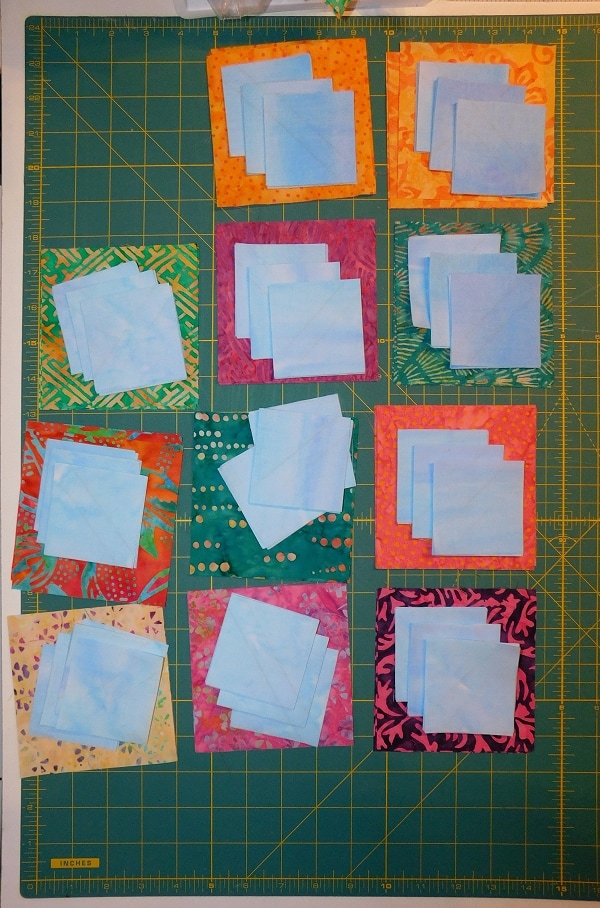
My panel was the full width of the fabric, 42” long and 21” wide. I decided that I should start by adding coping strips to the top and the bottom of the panel to increase the length to a length that would be equal to the multiple of the size of the border blocks.

Let me break that down for you. I knew I wanted a small sized block for the block border that I planned to place alongside the panel. I decided to use a 5” block for the border assembly. If I divide 42 by 5, the sum is 8 with a remainder of 2. Now I needed to round up to the next whole number and make it 45. When I divide 45 by 5 I get 9. So that means I will need nine blocks at 5” square for both block borders. Since there are two block borders I need a total of 18 blocks.

The coping border strips that I would add to the top & bottom of the panel would increase the length to match the 45” measurement I came up with. There is more information and an explanation of this calculation in the pattern.

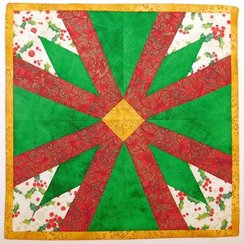
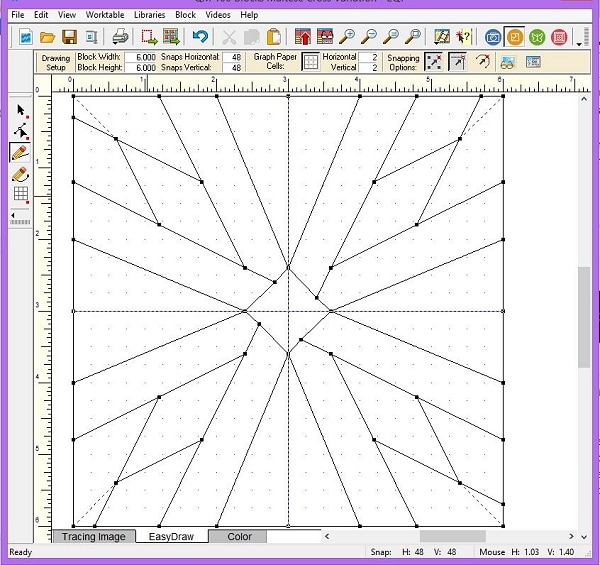
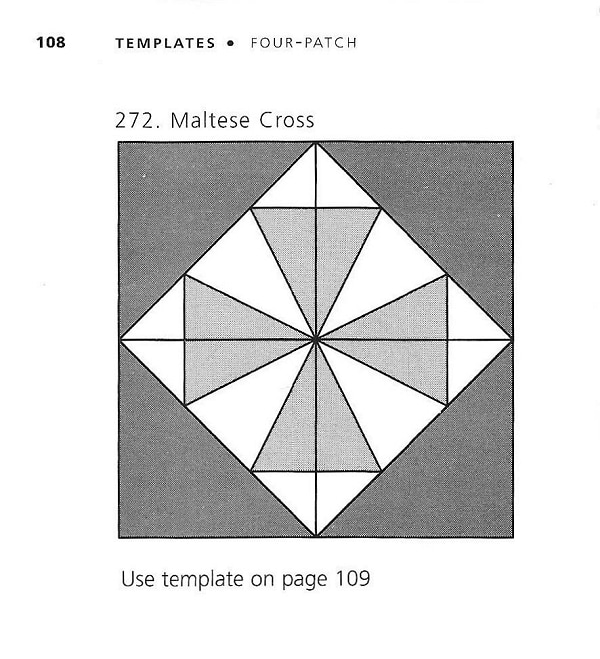
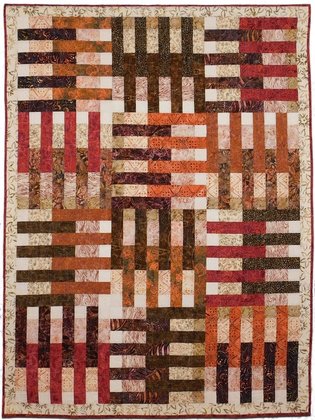
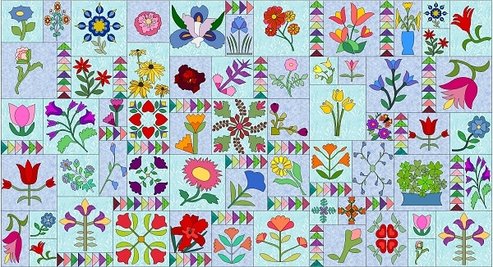
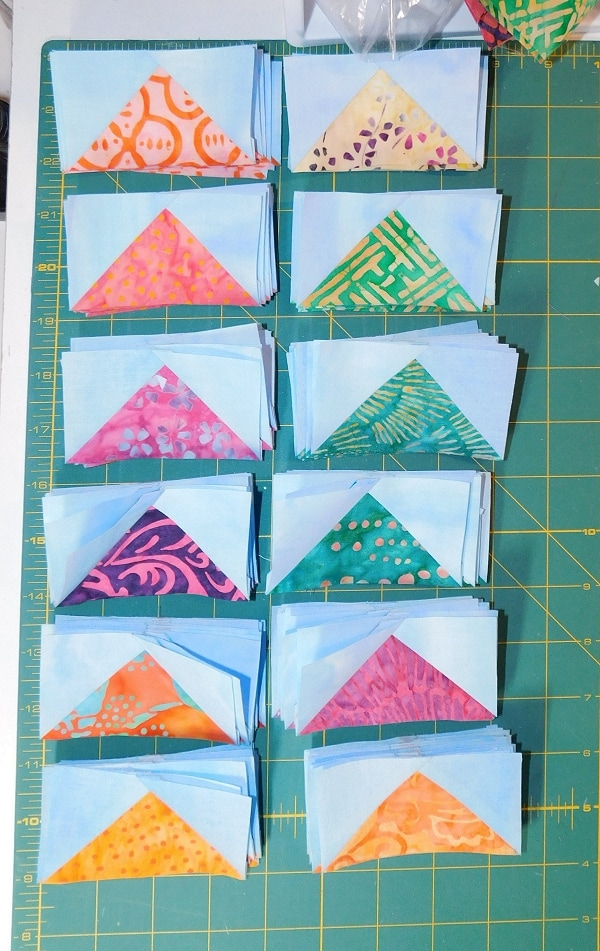
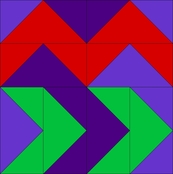
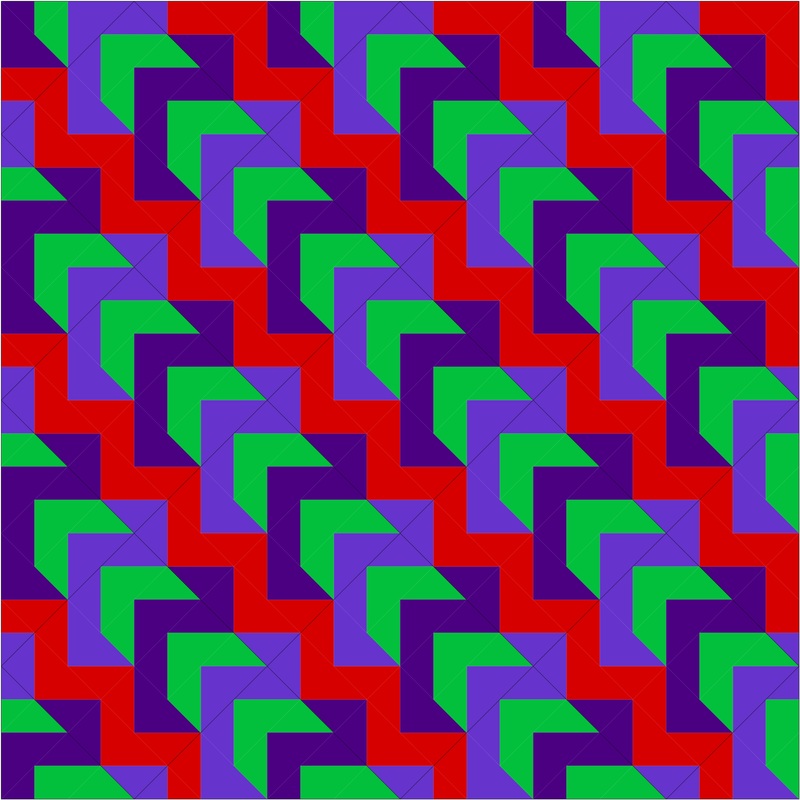
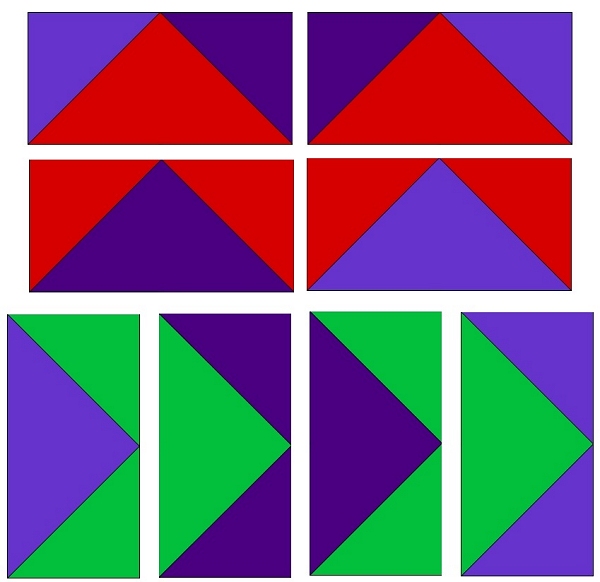
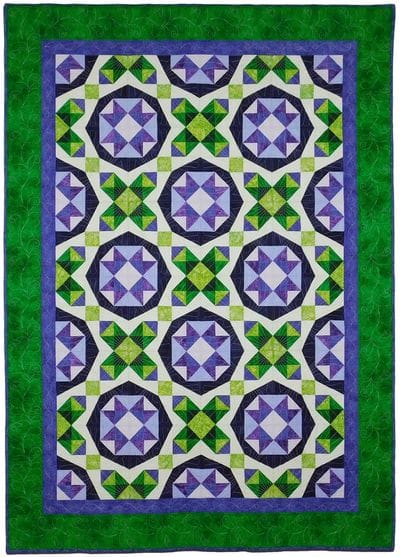
You can use any block you want but I decided that since I was dealing with frolicking fairies, I wanted a ribbon border. I almost sure that the frolicking fairies were asking for a ribbon border and I was able to hear them. A mock ribbon border is created when you join what I call “envelope” blocks together as shown below. As you can see every other block is rotated 180 degrees so that the small light valued triangles meet.
Picture
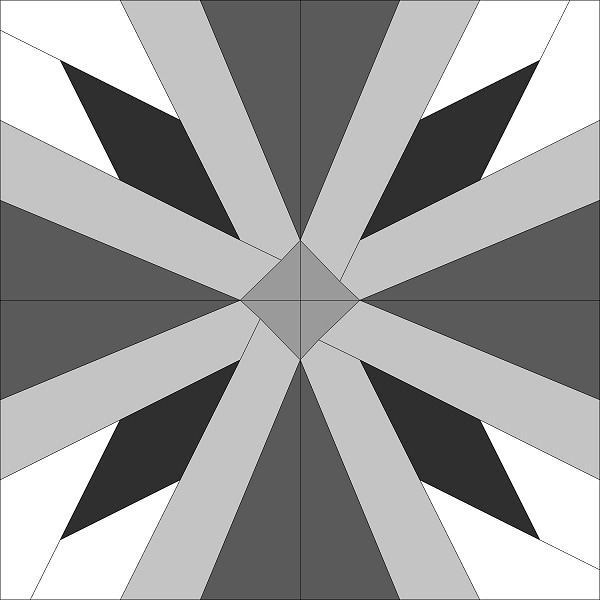
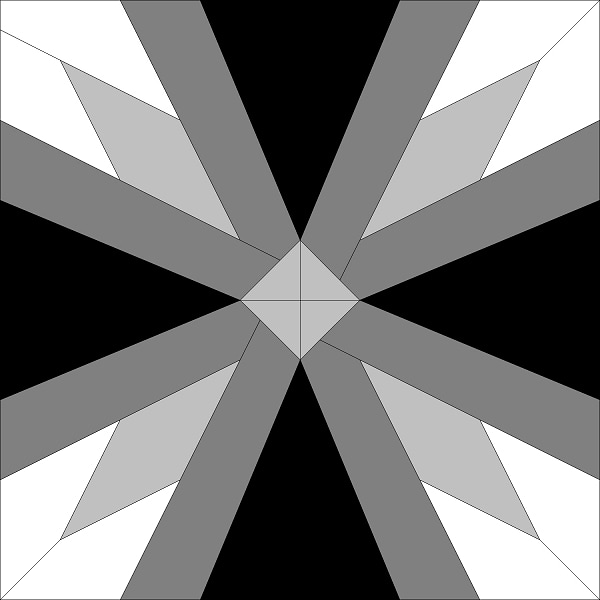
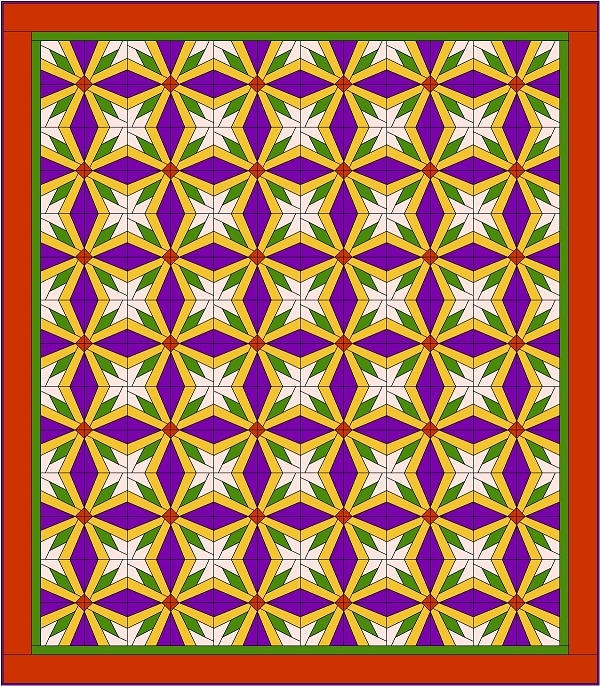
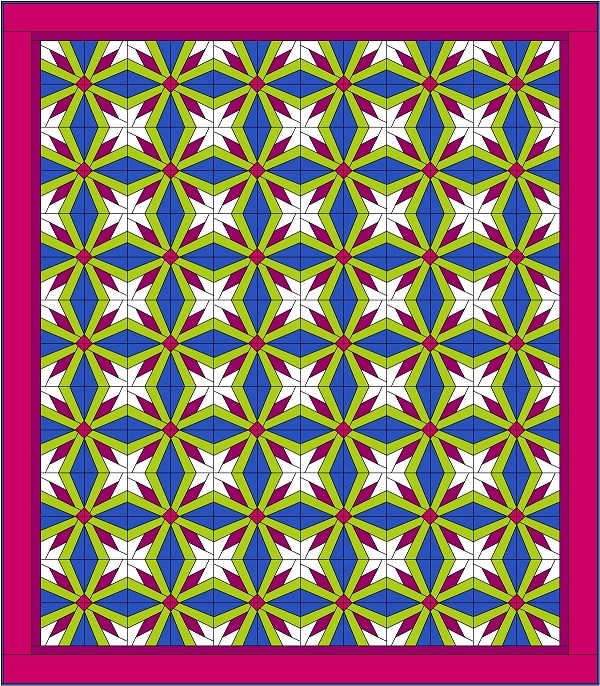
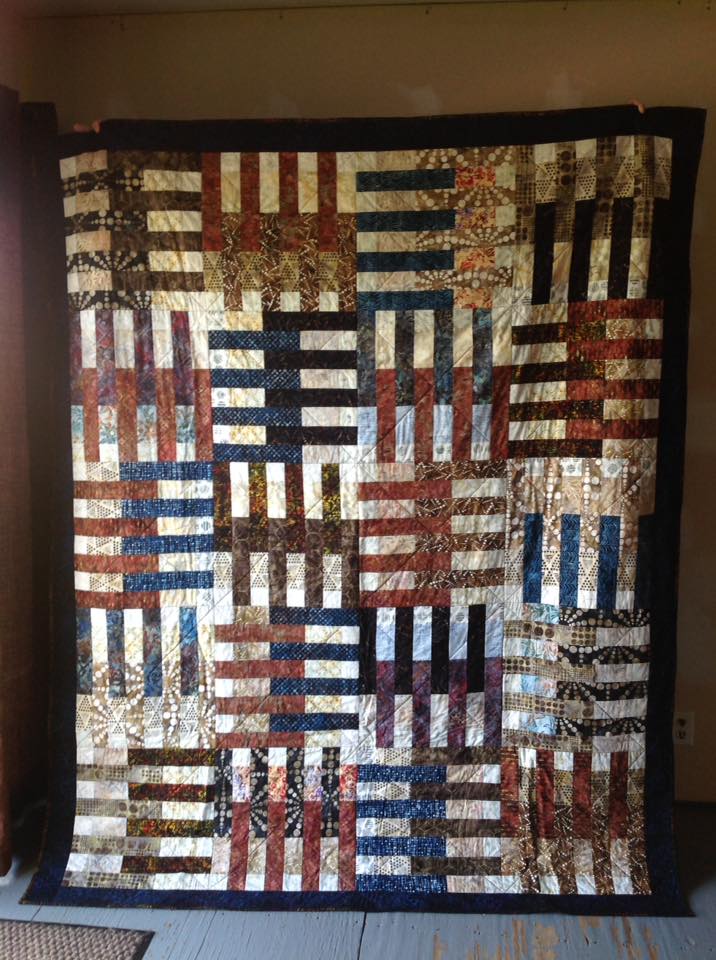
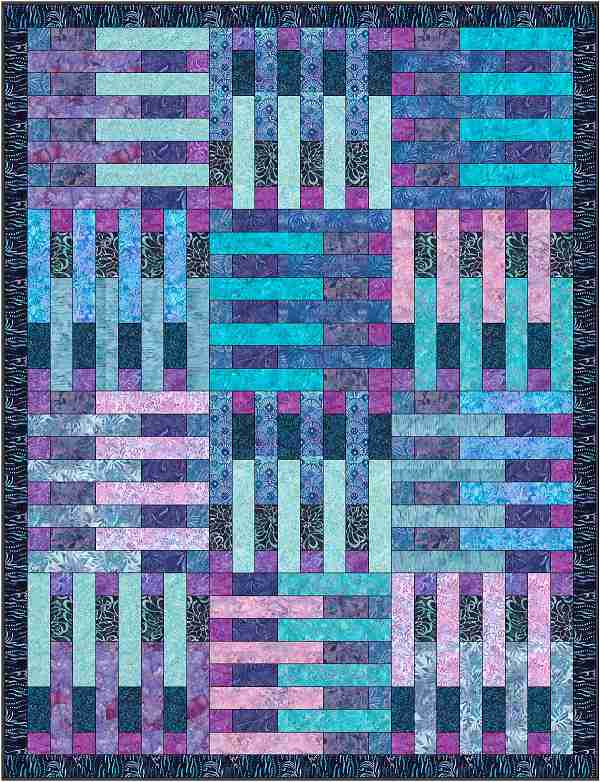
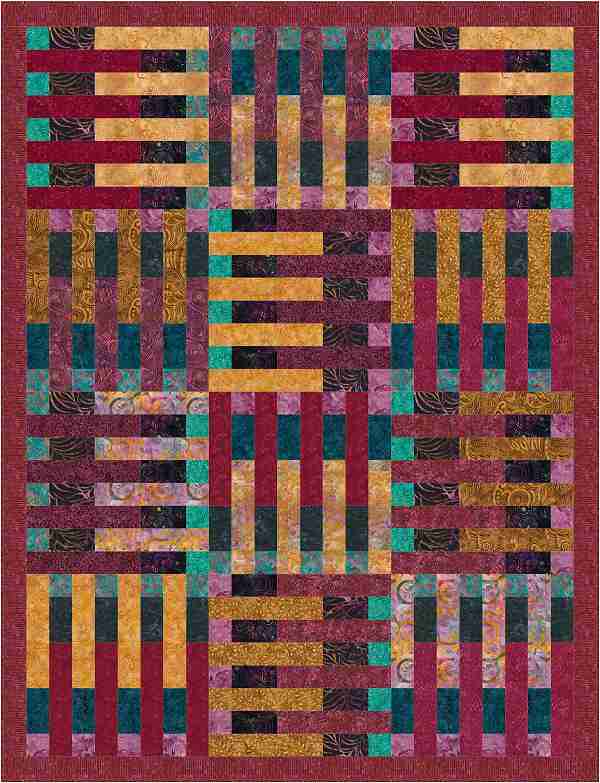
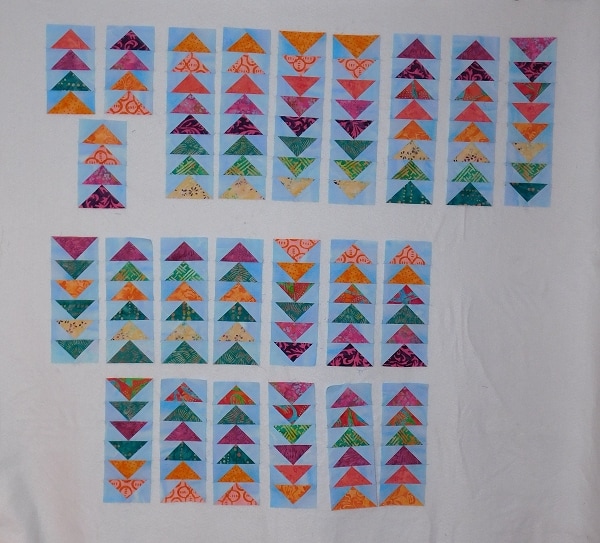
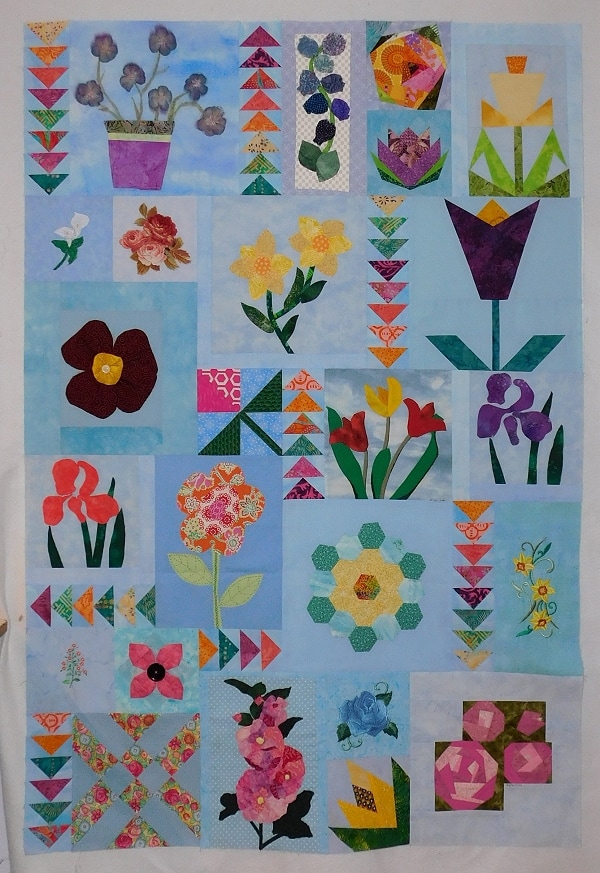
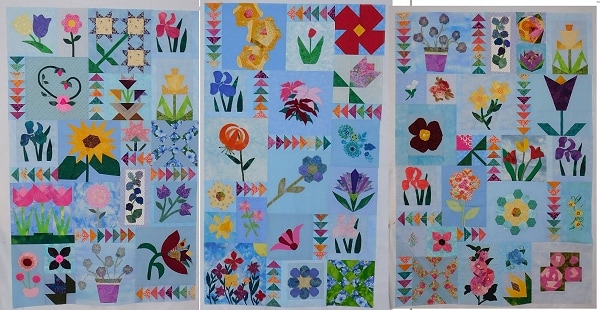
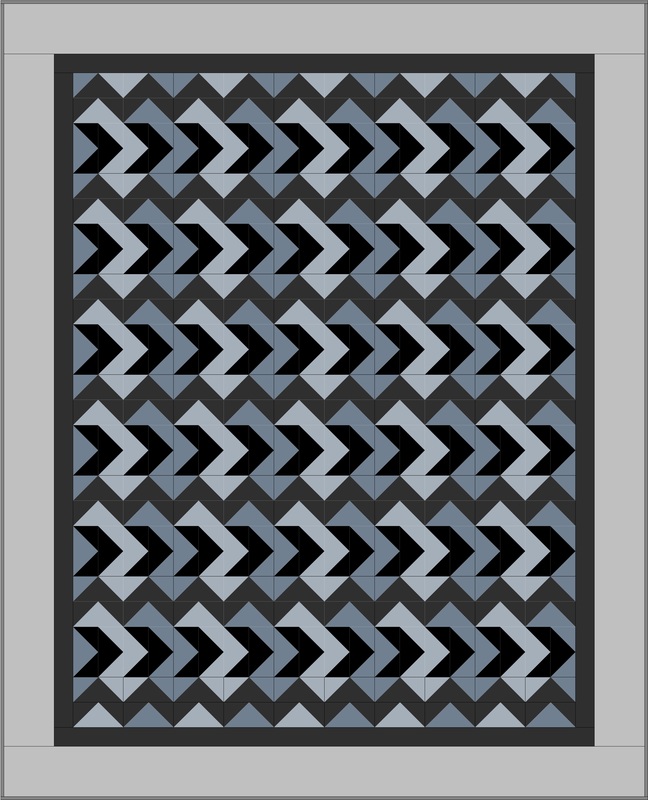
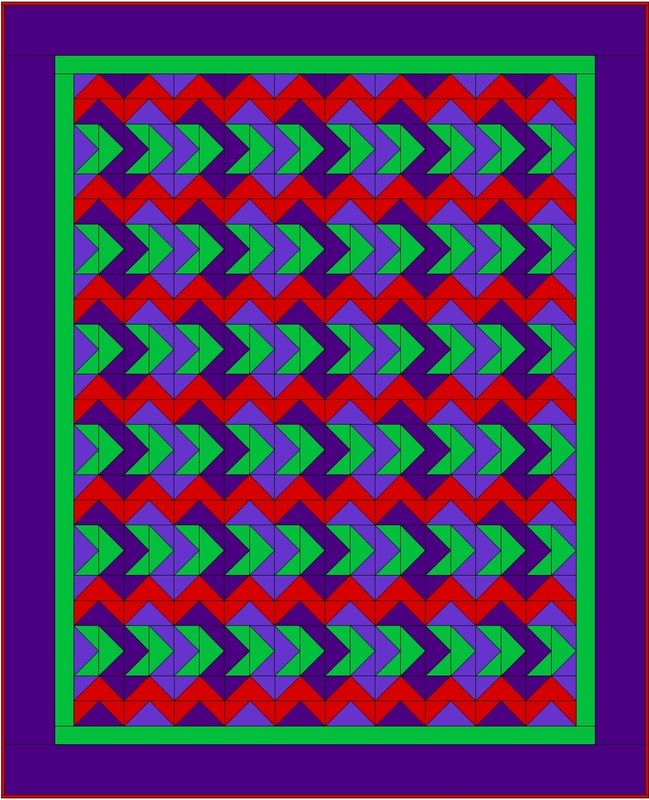
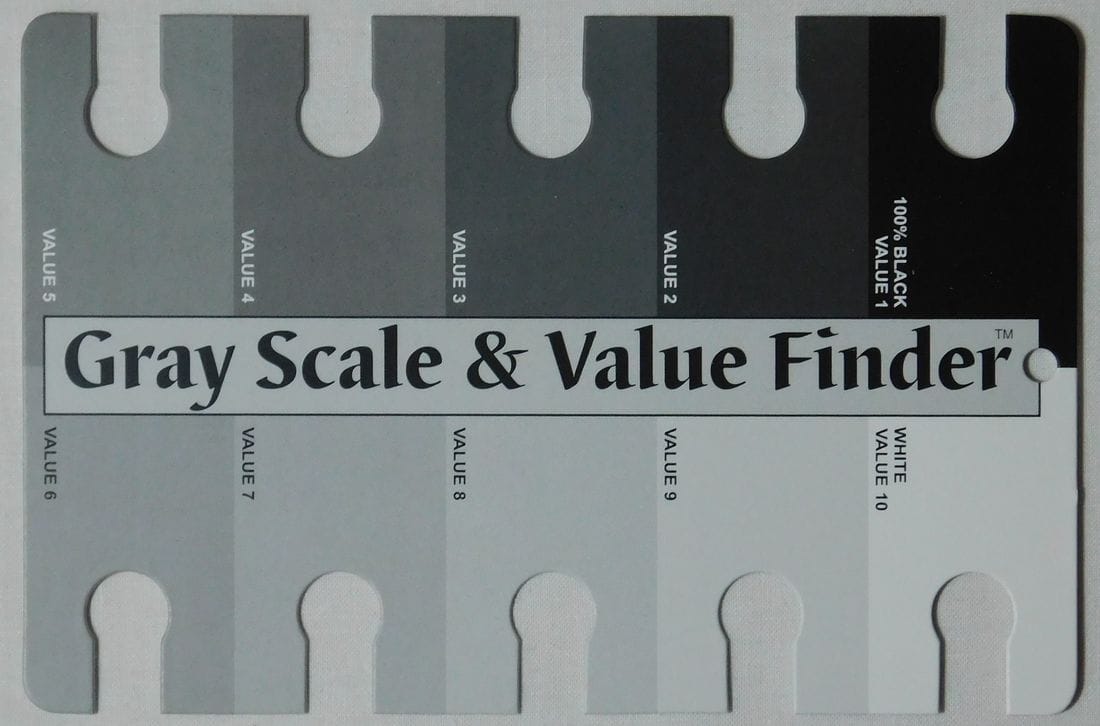
I created my ribbon border to look as if it was a light and medium valued ribbon laying on a dark background. You can create an alternate look by switching the placement of the values in the ribbon. By rotating the blocks to have the small dark triangles meet you get the opposite result; a dark and medium valued ribbon laying on a light background.
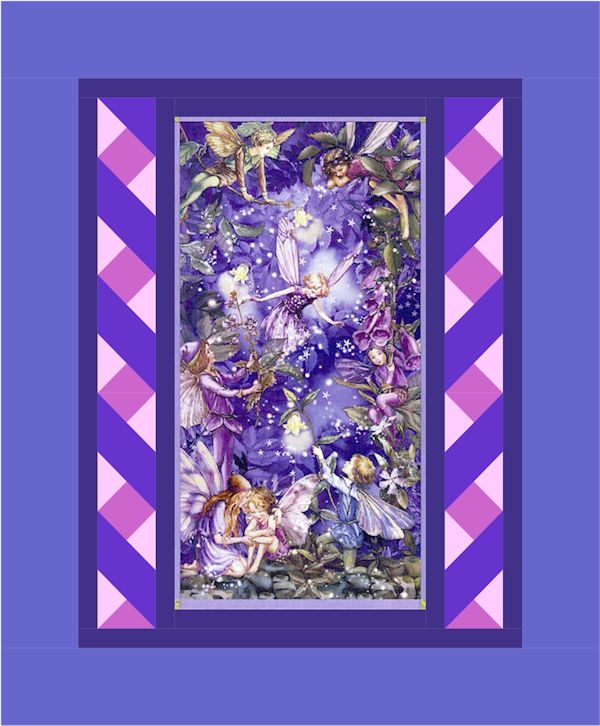
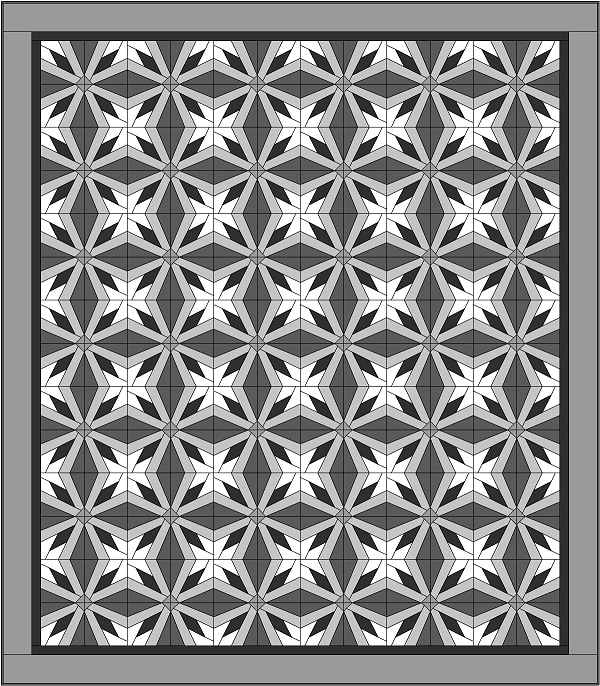
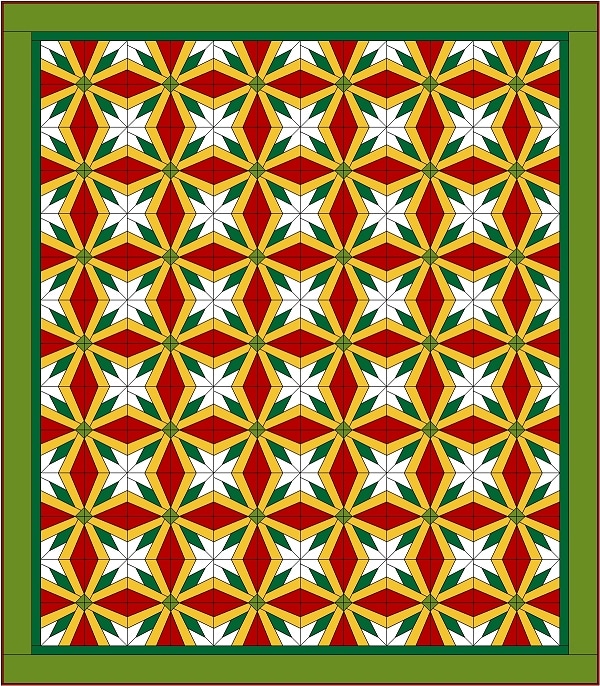
The key to the success of an illusion of a ribbon is in keeping the values of the ribbon triangles close to each other and separate, visually, from the background. I’m working with three values; light, medium and dark. To give the ribbon visual continuity I needed to use the dark & medium values together or the light & medium values together as shown in the examples above.

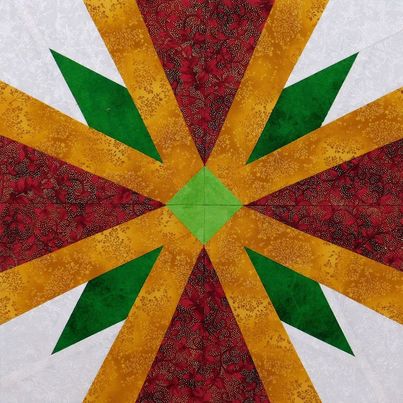
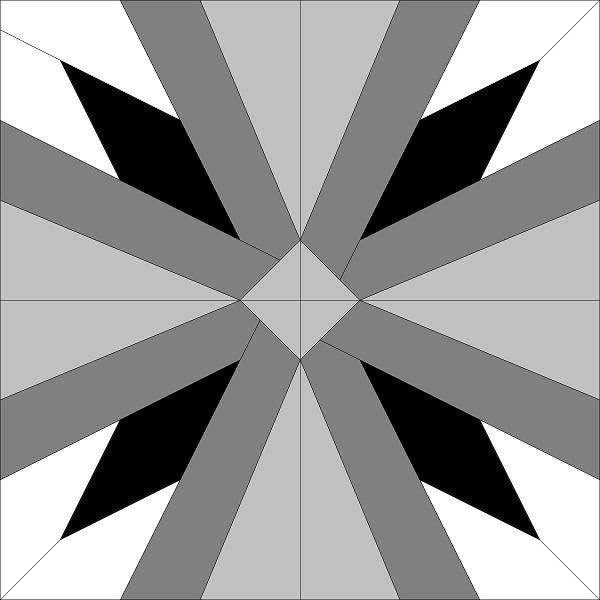
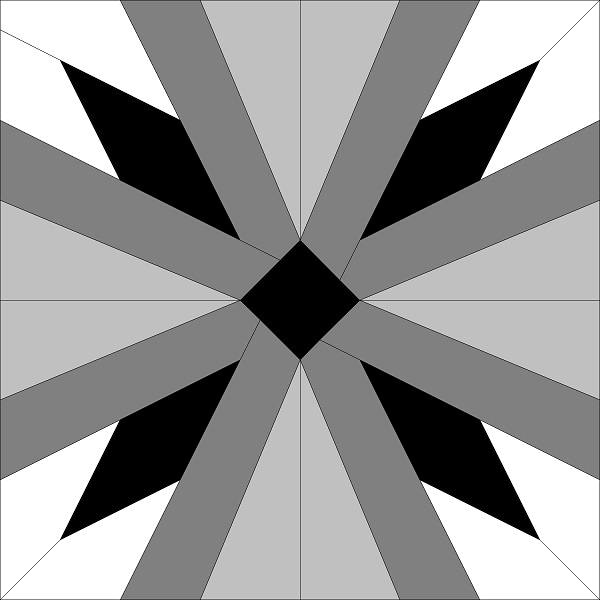
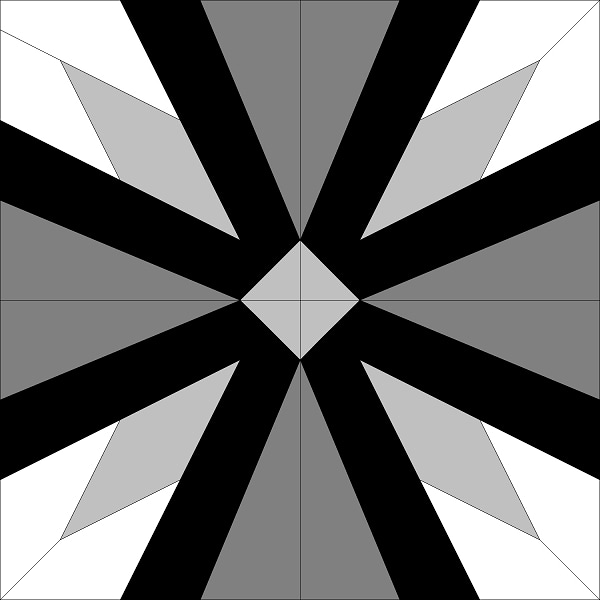
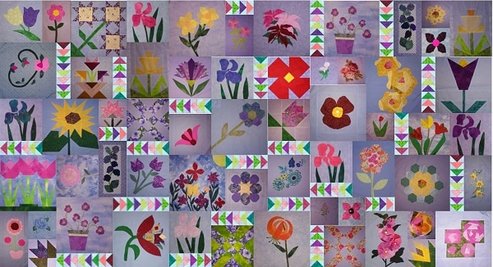
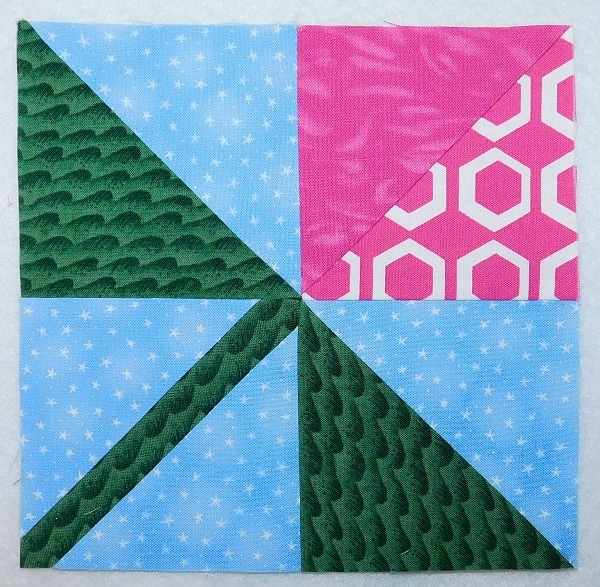
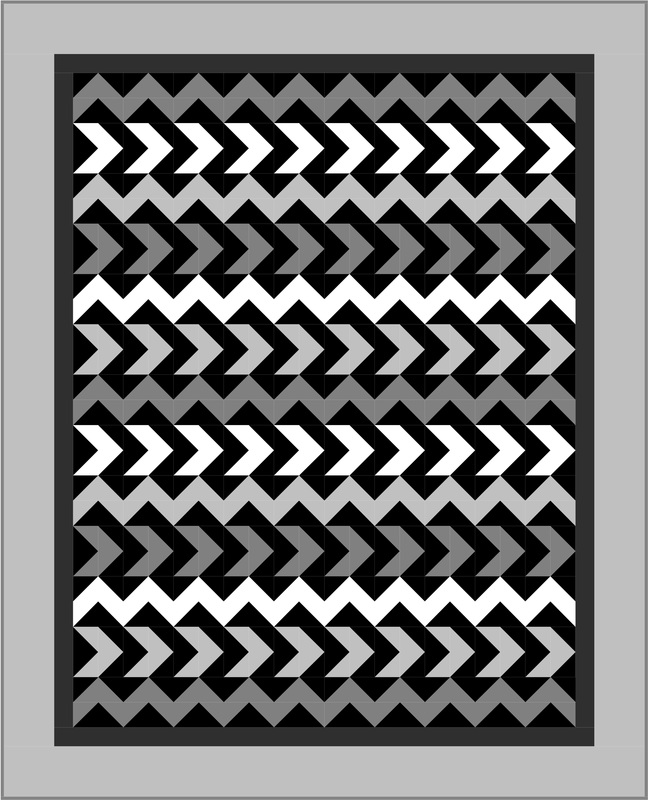
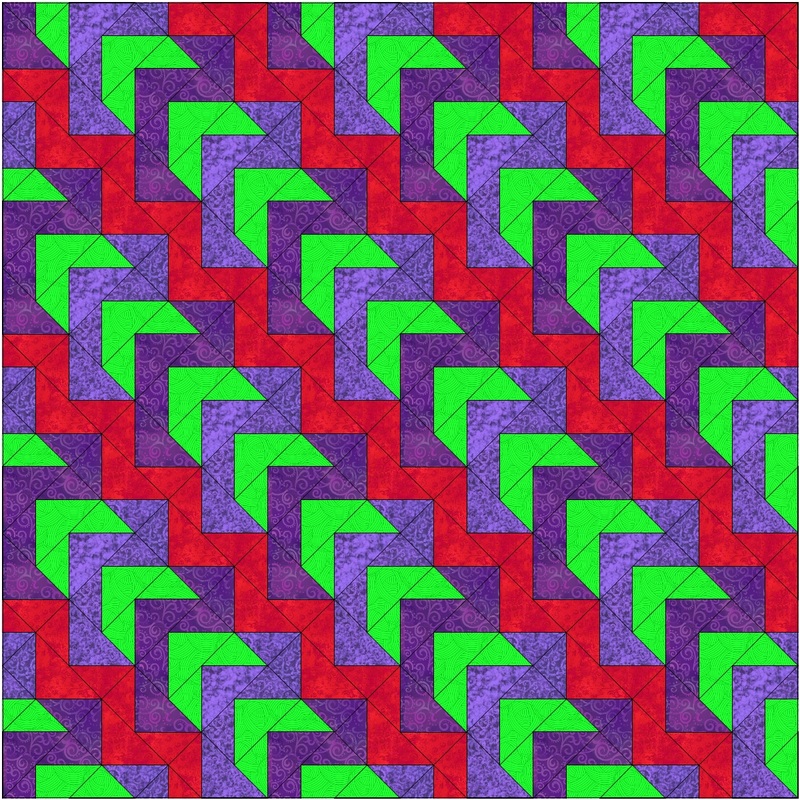
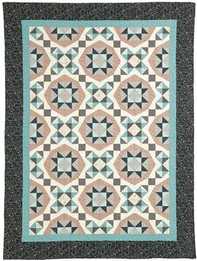
If you try to make the ribbon from the light & dark values and place it on the medium background they fight with each other and you lose the visual illusion of a ribbon. Check out these examples below. They’re not horrible but I think the other examples above look better.

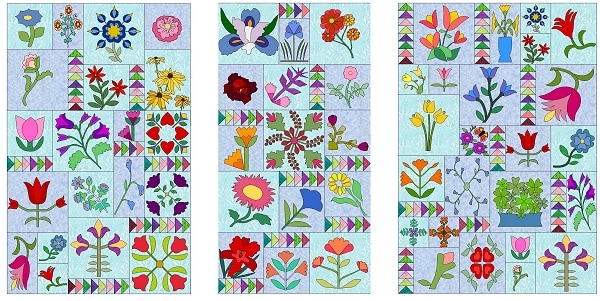
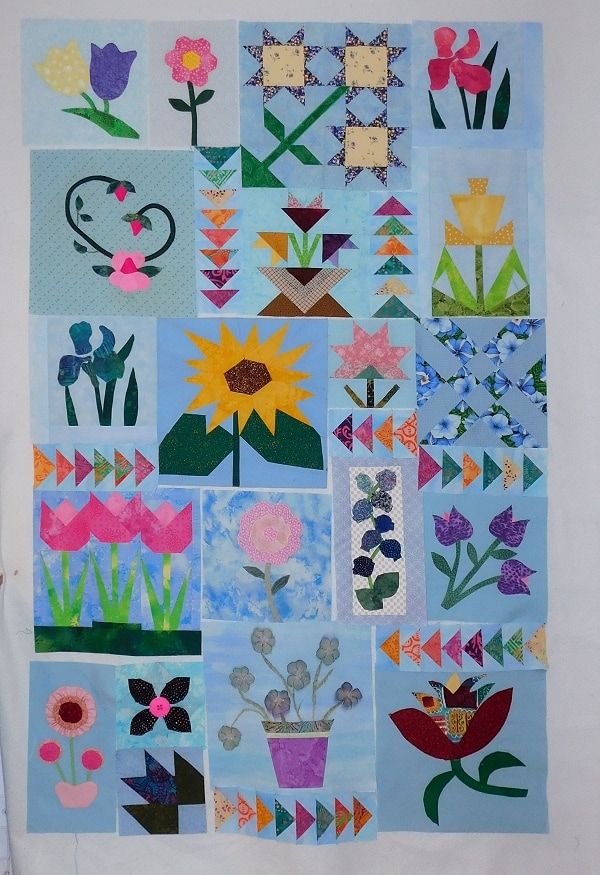
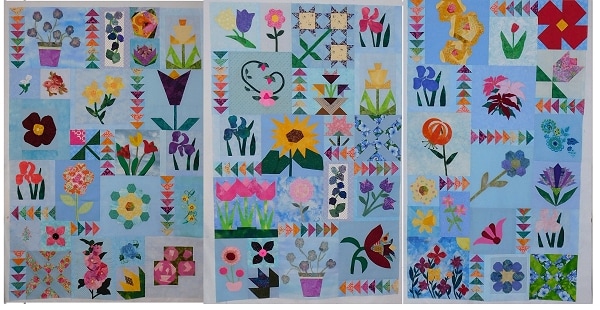
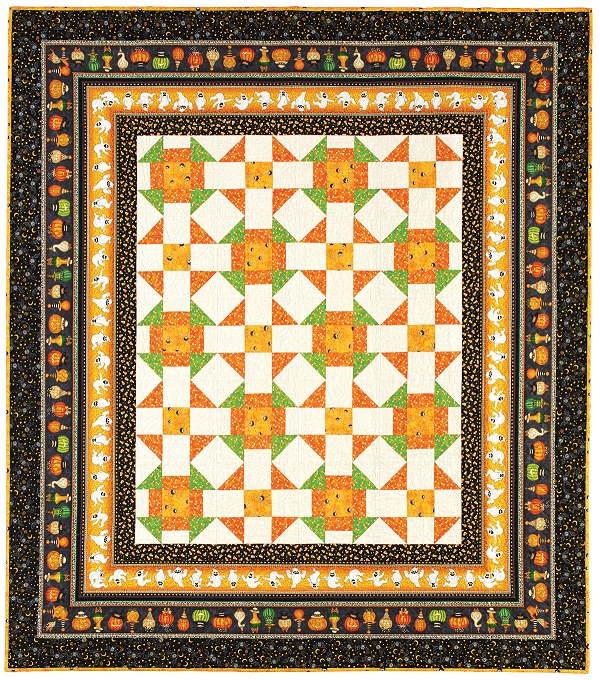
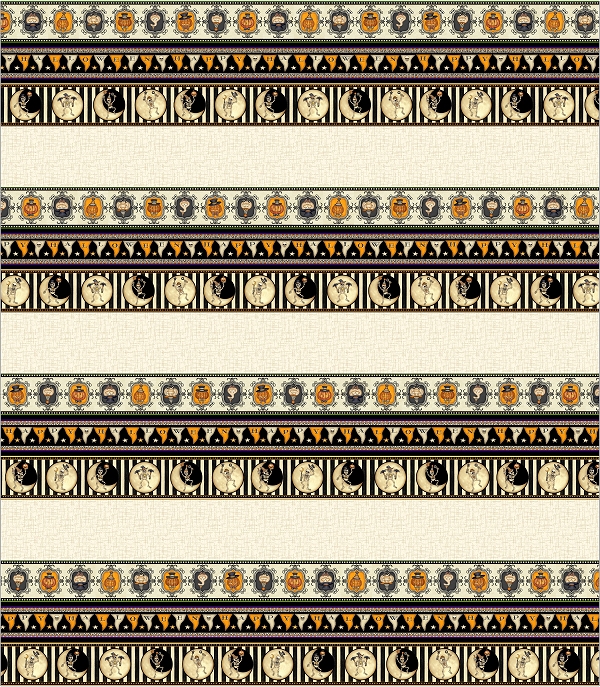
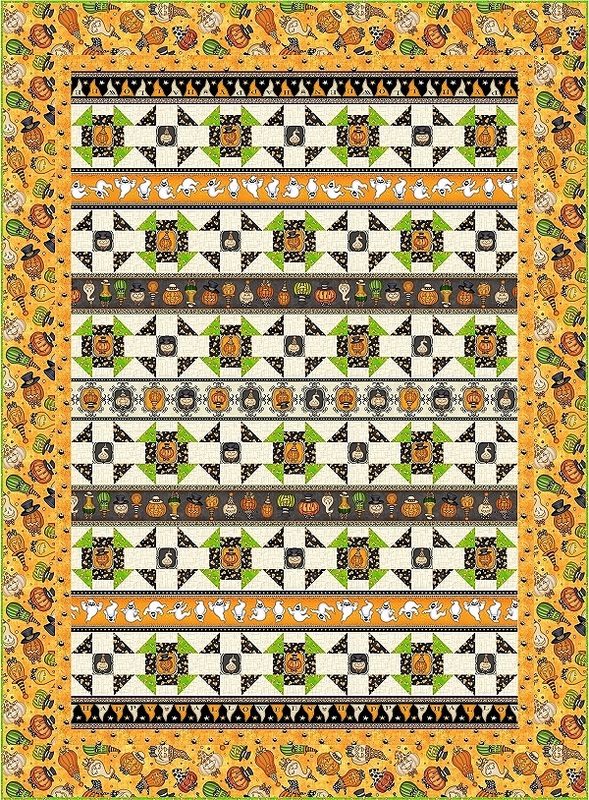
Now let’s play! I’m going to show you how this looks using a really cute Halloween collection called Creepy Hollow from Quilting Treasures. Here are two examples that demonstrate both ribbon border value placements. As with the original Fairy Frolic design I used fabric for the panel coping strips that matched the rest of the inner border fabric.

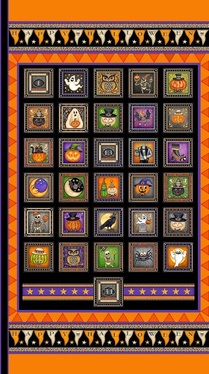
The panel for this collection does continue from one selvedge edge to the other but the main parts of the design fill a smaller area than the fairy panel. Therefore it looks as if another fabric had been added to the panel along with the panel coping borders to give it the right length. I think it looks really cute! If you like it too and are looking for Creepy Hollow fabric here is a link to Google shopping for the collection.
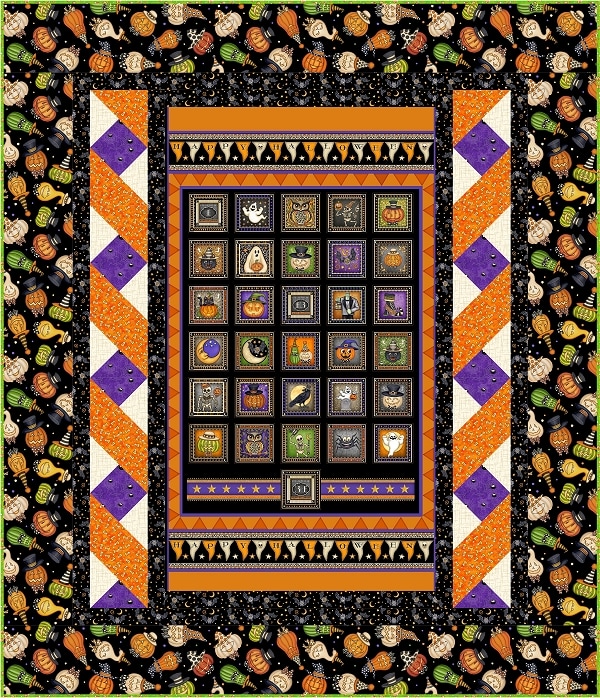
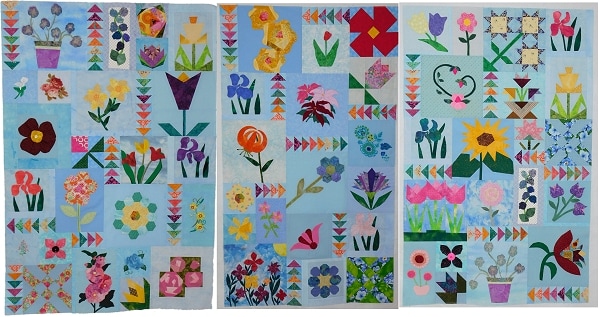
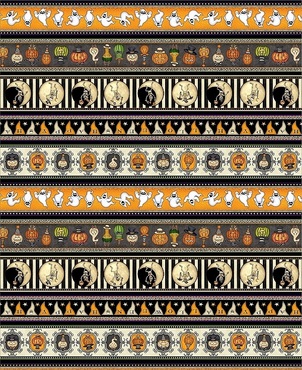
Continuing with this discussion of the coping borders, I want to point out that the fabric you use for that part of the design does not have to match the fabric used for the inner borders. Also, if your panel is shorter than my fairy panel you would resolve this by cutting the coping borders at a wider dimension. The calculation for this is included in the pattern.

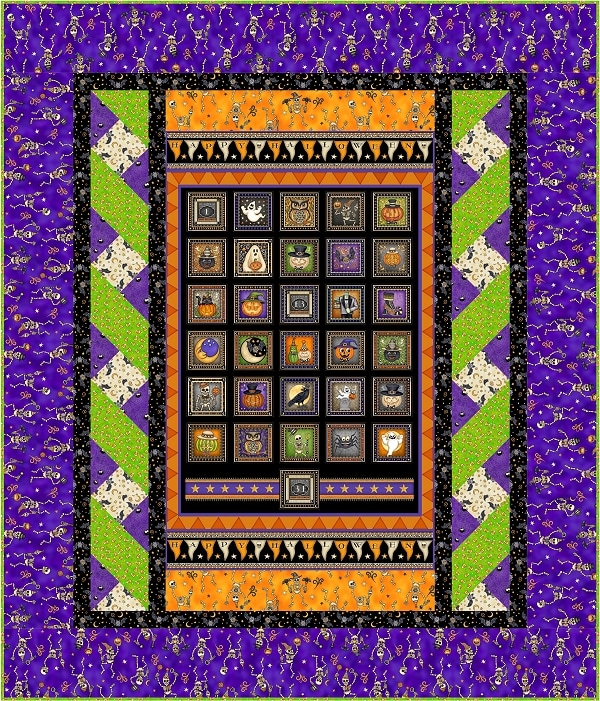
The coping strips in these two examples are occupied by dancing skeletons on an orange background. In both of these the coping border is cut very wide to compensate for the lack of length in the panel design. Once again I’m showing two examples that demonstrate both ribbon border value placements. First the dark & medium values together and then the light & medium values together.
I hope you’re excited and feeling inspired by my post and the pattern I have offered you. I can’t wait to see what your version will look like! Please send me a photo of it when you have completed yours. And don’t forget to leave a comment. That way I know I’m not alone here. : ) You can find the link for this pattern below.
 
This pattern is available from download from my ETSY Shop. Click here to purchase this pattern.

I hope you have a happy day full of quilting! Namaste my quilting friend, Janice

0 Comments

QUILTMAKER'S BLOG TOUR - 100 DESIGNER BLOCKS VOL. 15

5/4/2017

211 Comments


Block # 1412         Mock Maltese Cross

Picture
Hello Quilting friends! Welcome to my blog for the Quiltmaker Road Rally! Here's my block, Mock Maltese Cross. I’m very excited to have a block featured in Volume 15 of Quiltmakers 100 Block Challenge!

I'm super excited this time because my block is on the cover! You can see it to the left of the list of names, at the very top. To celebrate I will be giving away a copy of the issue. I'll also be giving away a second copy courtesy of the folks at Quiltmaker. I hope you're as excited as I am. Please read to the end to find out how you can get your copy. This offer ended midnight Sunday, May 7.

Congratulations to our winners Luiza G. from Brazil & Terri N. from Iowa, USA.

Picture
The folks at Quiltmaker will be featuring different blocks each day. They will also have some great daily prizes and a grand prize drawing at the end of the tour. Click here to visit their Quilty Pleasures blog and learn more.

I want to share the story of my block with you. I belong to a quilt guild called the Connecticut Piecemakers and every year we have a pot holder exchange at our Christmas holiday luncheon. We make either a holiday themed pot holder or one themed for everyday use. I chose to make a holiday pot holder. When I started to think about a design I thought of poinsettias.

Picture
Picture
I began by doing a block search for a poinsettia block in my Electric Quilt software (EQ). I found ten choices in my search. The one I chose comes from the Block Base software I purchased from Electric Quilt Company. The block reminded me of Iron cross. The only problem was I was not about to attempt to piece it with a square in the middle as it was shown. No way! I haven't got that kind of patience. I figured I could find an easier way to do it. I really like foundation piecing because of the accuracy that can be achieved. So I altered to the block to suit my needs.
To convert the block I started by setting up my worktable drawing set up with a block size of 6 inches and 48 snap points. I then set the grid to 2 blocks horizontal and vertical. For Snapping Options, I made sure that the “snap to grid points on worktable” button and the “snap to nodes off drawing” button were on.

I selected the block for editing and then clicked the “Easy Draw” tab to edit the block. I then deleted the square in the middle that I didn’t like. I’m only going to work with one quarter of the block so I converted the rest of the lines into guides. Next I converted two of the lines in the point to guides.

I then used the “shape” tool to extend the remaining line to the edge of the block while trying to maintain the same angle as the original point. To do this turn off the “snap to grid points on worktable” button. The reason I did this is because I needed the pattern to be compatible to foundation piecing.

Next I connected the nodes with a line to create the other side of the point. I also added a diagonal line across the points where the square used to be. I then used the “shape” tool to stretch one of the lines on the point heading towards the center. This was also done to facilitate foundation piecing.

Now it was time to complete the block. I clicked “select all’ and opened up the “Symmetry box”. Next I clicked “Clone” and rotated the selection 90 degrees. I then carefully placed the selection so that it connected with the previous image at the node.

Then I zoomed in to center of the block so that I could make sure that the two images had indeed connected at the node. I repeated this step two more times to fill the remaining two quadrants. To complete the block add a horizontal and vertical line to delineate the four quarters. Then I colored the block. I started with a value placement similar to the original block.

Next I played around with the placement of values. I tried out a few variations before making my final choice.
Now that I had made my final decision about value placement it was time to pick out colors.

After I was done I started to realize that my block looked like an Iron cross. I decided to look up the Iron cross on Wikipedia to find out more about the symbol. While reading about its origins I came across a statement that said “It was ultimately derived from the cross pattée occasionally used by the Teutonic Order from the 13th century.” Well what the heck is a “cross pattee” I said to myself? Of course being the history geek that I am, I had to look up “cross pattee” and find out more about this symbol. It was pretty interesting so I’ll attach links for both web pages to the images of the crosses below.

As I was trying to think of a name for my block decided against using the name “Iron Cross” because it has negative connotations. As for calling the block “cross pattee” I wasn’t too keen with the idea either. If a history geek like me had never encountered the word before I didn’t think it would resonate with folks. So I went out on a limb and named it Maltese cross variation even though it doesn’t look exactly like a Maltese cross. My block is a bit of a mix between the two. Just like the cross pattee, on my block, the ends of the four cross points are flat. Yet instead of the sides of the cross points being concave, the sides on my block are straight, just like a Maltese cross.

I have a couple of books that are great resources for quilt block information and ideas; 1000 Great Quilt Blocks by Maggi McCormack Gordon and the Encyclopedia of Pieced Quilt Patterns by Barbara Brackman.  The poinsettia block I started with came from the Brackman book. EQ used this book as a reference for their Block Base software. In the 1000 Great Quilt blocks book my block resembles their idea of a Maltese cross. It seems that my interpretation isn’t that far off.
Getting back to the quilt block I want to show you a layout in a queen size with four different color variations. I used a 12” block, in a 6 block x 7 block layout, with a 1.25” inner border and 4” outer border. It finishes at 82.5” x 94.5”.

Well, I hope you found this blog interesting. For one chance to win a copy of Quiltmakers 100 Block Challenge Volume 15, please leave me a comment below. Let me know what you like to read about and or what you think of my post. I always try to respond to comments but there are so many during the blog tour that I don’t always accomplish my goal. So please forgive me in advance.

For a second chance to win a copy of this issue you can sign up for my emails and/or visit my Facebook page and click like. I really appreciate your support. I promise that the email list is my use only. I send out emails when I have something exciting to share with you, like a new blog post or a free pattern. This promotion will run until midnight on Monday, May 8, then I will pick two names at random. Thank you for visiting! 

Happy Quilting, Janice


211 Comments

Quiltmaker's 100 Designer blocks Vol. 15

5/1/2017

28 Comments


Road Rally Blog Tour for Vol. 15 Starts today!

Today is the start of the Quiltmaker Road Rally Blog Tour! For more information about the Road Rally check out their blog at Quilty Pleasures. Be sure to visit them everyday as they will be featuring different blocks each day and giving away lots of goodies. Please be sure to come back here on Thursday May 4, 2017. That's my featured block day. On Thursday I will tell you how you can become the proud owner of Quiltmaker's 100 Blocks Volume 15. But wait, there's more... My block is on the cover of this issue! in honor of this momentous occasion I will be giving away two copies if this amazing resource.

Have a great day and happy quilting! Janice

Picture
28 Comments

Quiltmaker's 100 Blocks Volume 15 & Snow dyeing

4/24/2017

4 Comments

 
Picture
Hello Quilting Friends! I'm happy to announce that I have another block featured in Quiltmaker's 100 Designer Blocks. This issue is the 15th volume for Quiltmaker and the seventh for me. I hope you'll join me next week for the Quilty Pleasures Road Rally blog tour. The folks at Quiltmaker will have some great prizes for you. Plus each designer, including me, will be giving you a chance to win a free copy of this issue.

The tour starts next Monday, May 1, 2017 and continues through to Friday. Make sure that you check the Quilty Pleasures blog each day to see the blocks that are featured each day. Plus you don't want to miss out on your chance to win some nice schwag that they will be giving away. The date for my blog stop is Thursday, May 4th.

One of the prizes that they will have was donated by me. It's a beautiful snow dyed mandala that I made this past Winter. I've only done snow dyeing once before and it was a blast!. You can read about it by clicking here.

I waited almost too long to get around to snow dyeing this past Winter. All the snow had melted here in Connecticut but Mother Nature cooperated by giving me one last snow storm. So I made the best of it and procrastinated no longer. Take a look at the results in the gallery below. I'm not going to tell you which one is part of the Quilty Pleasures Road Rally prizes. You'll have to check their blog to find out next week.

The last thing I want to tell you is that my block has made it onto the cover! To celebrate I'll be giving away an extra copy of Quiltmaker's 100 Blocks. So that means that you have two chances to win a copy of this fantastic resource from me. Check back here to next week to find out how you can own your own copy. I hope you'll come along for the Road Rally. Sign up for my emails so you don't miss a thing.

Happy Quilting, Janice

4 Comments

Free Pattern Friday - APRIL 2017                               NUTMEG & CINNAMON - A.K.A. WELCOME MAT

4/14/2017

2 Comments

 
Hello quilting friends!

I have decided to start a new tradition that I'm calling Free Pattern Friday. Once a month, on a Friday, I will make a pattern available as a free PDF download. The pattern will be available until I post the next one. Then it's gone! So make sure you download your copy today.
 
You may also want to sign up for my mailing list. That way you’ll never miss an update to my blog. I promise never to sell your name to anyone. I will only ever use it to let you know about what’s going on at my website.

Picture
The pattern for this month is called Welcome Mat. This design has a funny story and you can read all about it on my blog by clicking here. The working name was doormat but that didn't sound very nice. So I changed it to Welcome Mat.
 
While surfing the net I came across a beautiful version of this design created by Helle Stork. I think that she did a beautiful job of pulling together fabrics to make this design shine. Thank you Helle for letting me share your photo with everyone! You should be very proud.

In the gallery of photos you will also see the back of the quilt. This is a great way to use those large prints in your stash. I also want to introduce you to my new kitty Stella. I had the quilt laying out for all of maybe an hour before Stella decided it looked like a good place for a nap. So she nosed out a little cave for herself and went to sleep.

In April and June of 2016 we had to say goodbye to two of the very best cats that we ever met, first Babygirl and then Mr. Grey. It was heartbreaking for us but they both lived very long and exciting lives. We were very lucky that they picked us to be their humans!

Stella must have heard that we were without a cat and found her way to my friend Rachael’s house up in East Durham New York about a week after Mr. Grey passed away. Since She was a stray who needed a home. Isn’t that an amazing coincidence? Maybe it wasn’t a coincidence……..  

Anyway enough about the cat population at my house. In this gallery below you can see what this design looks like in four other collections from Timeless Treasures. I also have more design information for you to peruse on the original blog for this design.
I can’t wait to see what your version will look like! Please send me a photo of it when you have completed yours. And don’t forget to leave a comment. That way I know I’m not alone here. : ) You can find the link for this pattern below.
 
This pattern is available from download from my ETSY Shop. Click here to purchase this pattern.

I hope you have a happy day full of quilting! Namaste my quilting friend, Janice

2 Comments

How a Quilt Guild Block Challenge Became My Quilt Design Challenge

2/4/2017

4 Comments

 
I belong to the Connecticut Piecemakers Quilt Guild of Trumbull Connecticut. Click here to visit our website. Our guild hosts a quilt show which is held biannually. Among the usual features of the quilt show we include a guild block challenge. For the guild block challenge a chairperson is chosen and that person settles on a set of guidelines to be used for a creativity challenge resulting in a submission of blocks from the membership. Each member who contributes a block has a chance at winning the finished quilt top. If a member makes more than one block they have a chance for each block that they contribute to the project.

I volunteered to be the guild challenge chairperson and I quickly decided that flower motifs would be the first requirement for the blocks challenge. As for the size of the blocks I referred back to what I remembered from past challenges. From what I remembered most of the blocks have been blocks of the same size. Although I do remember one year when the blocks only had to be the same height, 12”and for the width the block; it could be 6”, 9” or 12”. That turned out to be a beautiful quilt and the one I remembered most.
The main inspiration for block size in my challenge came from the book Simply Dynamic Sampler Quilts by Marianne Hatton. Her designs include blocks that use a 2 inch multiple base in many combinations such as 2” x 2”, 2” x 4”, 4” x 4”, 4” x 6” and so one up to 24“x 24”. I haven’t completed my quilt using this design arrangement but I have a few blocks completed. Click Here to visit her website and see her quilts.

Another source of inspiration was a quilt I saw in my issue of Quiltmaker Magazine March/April 2016. The quilt was called "The Swoopers" and it was designed by Diane Volk Harris. This pattern featured a layout that incorporated blocks of various rectangular dimensions. To create unity the background for the blocks were all the same color but as the blocks were made by different individuals the backgrounds were not of the same fabrics in the chosen color. This gives the quilt a bit of movement without being overwhelming.  As a result of the varied block dimensions used in the layout, there were gaps in the block arrangement. This problem was cleverly solved by placing runs of Flying Geese units where the gaps appeared. I would use that as my jumping off point.
Picture
Here were the final challenge rules I gave to my guild members;
  1. All flowers must be on a light blue background of cotton broadcloth
  2. The motif can be applique or pieced as desired.
  3. Blocks size could be 6” x 6”, 6” x 9”,    6” x 12”, 9” x 9”, 9” x 12” and finally 12” x 12” inches for each block.
I received a large response from my guild mates. In total I received 59, yes that’s 5 and 9, blocks from 39 (40) of my guild mates! I’ll explain the number in parenthesis in a bit. Be patient young grasshopper, all will be revealed. Some members did indeed submit multiple blocks for the challenge quilt. The break down looked like this when I was done with an inventory of the blocks submitted.
12 – 6 “ x 6” blocks
2 – 6” x 9” blocks
4 – 6” x 12” blocks
20 – 9” x 9” blocks
4 – 9” x 12” blocks
17 – 12” x 12” blocks

Picture
To contribute to a bit of unity in the finished quilt I decided that the Flying geese would be bold, bright colors like those used in the flowers and that the background triangles for the flying Geese should be a light blue just like the sky background. I had received many different ideas defining sky blue for the background of the blocks given to me. At first I thought that I would have to gather and mix up various light blue blenders from my stash to use for the Flying Geese.

Then one day I had the great idea to use “Sky Blue” fabrics I painted using Mickey Lawler’s technique for the small triangles on the Flying Geese. Our guild has hosted Mickey Lawler the author of Sky Dyes a couple of times.

Her method of painting a sky utilizes a combination of turquoise and ultramarine with amazingly diverse results. This I decided would be the perfect solution. You can see the color I’m describing on her website. Even better many guild mates who took the class still had their sky fabric and donated it to the project.
Now that I had inventoried all of the blocks it was time to work on the placement for  the blocks. Ideally I wanted to work in Electric Quilt (EQ) with the actual blocks but unfortunately I could not do this because of the inconsistency of my camera distance to the blocks. That variable meant that the final jpegs were not in proportion to each other. When I tried to set the blocks to their finished sizes in EQ, I couldn’t see the whole flower motif on the block. Instead I used stock block designs found in EQ to come up with a layout because of the programs “snap to” function which speeds up the process of aligning the blocks to each other.
Staying with the general layout idea used in "The Swoopers" design I focused on random groupings of different dimensioned blocks. This resulted, as I knew it would, with gaps where I could place runs of flying Geese. I also wanted to keep similar blocks made by one individual away from each other in the layout to create diversity in the design. I also tried to keep the geese spread around the quilt in an asymmetrical fashion. To further this imbalance I placed the runs of flying Geese in opposing directions to create visual interest.
Picture
After designing the layout in EQ, I used Microsoft Publisher 2013 to manipulate the blocks images to match the layout. In publisher I was able to give each block a measurement proportional to its finished size and still see all of the flower motif on the block. I moved the blocks around until they matched the layout I had created in EQ. This gave me the guide I needed to complete the desired design layout.
Microsoft Publisher 2013 is not ideal for designing, at least not for me, as I don’t know how to make images snap to each other and have to manipulate everything with my hand. Which can be painful after extended periods of time. If you know how to “snap” objects to each other in Publisher 2013 please let me know
Picture
As you can imagine a quilt that contains 59 blocks is fairly large. The size of my final design was 57’ x 105”. Whoa nelly! Who’s going to be able to display that in their house? Certainly not Moi. To deal with the size of this behemoth I decided to turn it into a triptych. I learned about these in my college art classes. The format was used for a lot of Renaissance religious art. This was also a great solution because now more than one person can own a part of the design and display it easily. Some members made more than one block, so I divided their blocks among the three panels.
To make the Flying Geese units I had volunteers help with making the flying geese; Bev S, Betsey S, Connie S, Kathy C. Thank you ladies! I sorted the geese into sets and tried spread the different colored fabrics around as evenly as I could. I sewed them together into the desired of runs; 4, 6 or 8 Flying Geese each.
Some blocks weren’t the exact size I needed. That meant that I had to I needed have fabric that blends as much as possible with the existing background fabric. I would use this to make them bigger. If the blocks were more than ¼” off from the desired size, the block had to be made smaller before adding fabric. A decision had to be made about how much to cut from the block and from which sides. Another thing to consider is that the strips needed to be bigger than the desired size so that I could trim them down to size. For some blocks the fabric strips were added to all for corners and for others it was to two adjacent sides. This was dependent on how much space the flower took up within the block. Thank you Rita P. for help with this task!

For blocks that were almost the right size, within a ¼”; I cut a piece of freezer paper at least 1“ larger than the size of the block needed. I ironed this to the back of the block while keeping the block in the center of the freezer paper. Once it cooled I would turn the block over and square up the block cutting through the freezer paper. Now I had straight edges and square corners for joining to neighboring blocks.
As I placed the blocks on my design wall for the first panel I wanted to work on I had a discovery. “Hey! Where did this block come from?” I found out that I had a 6” square block that I forget to include in my layout. I don’t know who made it. Somehow the name tag disappeared. I know I’ll find out who made it eventually but for now what am I to do with it? Oh and another thing “Marge’s block is only 9 inches square and I need a 12 inch square block in that space!” No problem about Marge’s block, I’ll just add strips to it to make it bigger.
As for the extra block it time to go back to the drawing board. My solution was to create a new layout for one of the panels and make more blocks and geese if needed for the new lay out. The process took longer to procrastinate than to actually do! How about that? In the end I only would need to add two 6” x 6” blocks. I could get that done no problem. EQ to the rescue! EQ has an endless supply of blocks. I found two that I liked made a few changes and added them to the quilt design.

Now it was time to construct the quilt top panels. For each panel I would arrange the blocks and Flying Geese on the wall to match the layout I had printed from my EQ design. Next I would move the blocks into sub groups to reflect the sequence I planned to use to assemble the panel. I almost mixed up the block placement on panel three but I caught it before it was too late to rip out and fix. All in all things went well for the first two panels I worked on. 
When I finished sewing the third I realized that something had gone awry. Somehow I had changed the placement of the blocks so that two similar blocks would be next to each other when the panels are hung together as a set. The blocks I refer to are the pieced ones at the bottom right corner of the second panel and the bottom left of the last panel. Oh no! I couldn’t have that! How did I mix up these blocks?! Rather than obsess about how I had made this mistake I tried to focus on a solution.

My solution to my quandary, a quilting “shell game”. I switched the sequence of the panels for the triptych design.
The first time I rearranged them I ended up with the iris blocks next to each other. So I switched them around one more time. This time I had two sets of Flying Geese runs connecting and creating an "l" shape. I wasn't too thrilled with this but quickly overcame my bias when I thought of the other option which would be ripping stuff apart and re-sewing.

One last complication - My iron died on the last panel. But fortunately I don’t live in rural America and that problem was quickly solved.
I really like how the panels came out. Hopefully I can find a generous guild mate that is willing to put a stippling stich through the panels. If I can, then I’ll finish the panels with a facing and a hanging sleeve. I’ll be sure to post the finished quilt when that happens. Anyway that's how my guild's quilting challenge turned into my quilting challenge. Just remember that quilting can be a bit like engineering and problem solving is part of the process. Be in the moment and enjoy the challenge! It's a experience that helps you to grow as a human being.
Finally, if I were to do this again here are a few things that I would do differently;
Tips for future guild challenges
  • Impress upon guild mates the importance of using short stitches for all piecing 2.0 or 14 stiches per inch and shorter still for foundation piecing.
  • Try to have a buffer of background for applique or narrow sashing for pieced blocks. This way the block can be squared up to the exact size without disrupting the elements in the design. Also points will not disappear when sewn.
  • For applique blocks start with a square at least 2” larger than the desired size. Do not trim before handing off to guild challenge chairperson.
  • No 3 dimensional applique. All applique of this sort will most likely be subject flattening as the project is constructed.
  • Explain that any block not meeting these guidelines will be returned to the maker for improvement.
Thank you for reading my blog. Please leave comments below and don't forget to sign up for my email list. I promise I won't SPAM you. You'll be notified of when I post a new item on my blog. Which never happens more than once in a month.

Happy Quilting to all!


4 Comments

Quiltmaker's Blog tour - 100 Designer Blocks Vol. 14

11/18/2016

147 Comments


Block # 1359                Conduit

Picture
      Welcome to my blog for volume 14 of Quiltmaker’s 100 Designer Blocks blog tour. This is my block. I named it “Conduit”. I’ll explain how I developed this block using my trusty Electric Quilt software in this blog. I will be sending one lucky blogger a free copy of Volume 14 at the end of the tour. If you would like to be that lucky person you need to do two things, please visit my Facebook page and click on the “Like” and also leave a comment below. If you have already “Liked” my page then just leave a comment below. I will remind you what you have to do again at the end. Monday, November 21 at 12:00 midnight is the deadline. P.S. if you don't do Facebook, you'll still be included. Just tack that fact onto your comment that you leave below.
Congratulations to Barb Y. of California! I hope you find a lot of inspiration in this issue.
And a big thank you to everyone who visited and left a comment! I'm glad you enjoyed my block and my explanation.
The idea for this block came from my love of switching around the traditional value mapping of familiar blocks. I love Flying Goose units. They’re incredibly versatile to work with. By changing the value placement your ideas can travel into many different directions. I started with the Dutchmen’s Puzzle block shown below.
Picture
I handled the block like it was a four patch and rotated some of the double goose units. Next I changed the placement of the values to create a block that would tessellate with its neighboring blocks to create an endless tiling pattern.
Picture
Now it was time to choose the colors I would like to work with. I was feeling a bit psychedelic so I chose some stimulating colors for the unit. Here’s the block with the colors I chose.
Picture
First I used the block in a horizontal tile setting using the grey scale block. Then I plugged in the colored block to see what it would look like.
Then I played around with making it a bit more complicated. I wondered what the quilt would look like if I added alternate block coloring to the layout, below on the left result. I wondered what would happen if the values changed progressively through the design. This is the design on the right, below.
Going back to my first value map of the block I then wondered what would the quilt look like set on point. Here is the result in grey scale and in color.
I looked through the JPEG swatches in my EQ program for some blender and tonal fabrics to use in my design. On the left below, is an example of what it would look like with blenders from Quilting Treasures Fabrics. Next I needed to find fabrics in my stash to use in the block. Next I printed out the specification sheet from my EQ program, below right.
I took the image with me to look through my stash to see what would match the colors in my image as I imagined it. I started with the violet fabrics first. I needed one cool violet and the other needed to be a warm violet.
Picture
I found the two purples and now it was time to find the right green.
Flowing from left to right you can follow my process.

Now that I had my violets and my green it was time to look for the perfect red fabric to compliment the other colors.
At first I thought that I needed a true red color but when I looked at the violets and the green with the reds, I didn’t feel that they were the right match.

So I tried the very deep pink colors I have in my stash. These pink colors are so deep and saturated that they almost are like a red but they have a little more excitement to them. I really like the way these looked and on the right, below, is the one I chose from the box.
Now it was time to spec out the individual Flying Geese units that I needed to make.  After sewing up all the units and joining them together I was really pleased with the result!
I hope you enjoyed this blog post. Don’t forget visit my Facebook page (if you do FB) and click the “Like” button and also to leave a comment below. If you have already “Liked” my Facebook page then just leave a comment below. Do one or both of these things and you could be the lucky winner of a free copy of Volume 14 at the end of the tour. Monday, November 21 at 12:00 midnight is the deadline.

147 Comments

Quiltmaker's 100 block Challenge Volume 14

11/16/2016

1 Comment

 
Picture
Picture
Check here on Friday November 18, 2016. On that day I will reveal my block and I will tell you how you can win a free copy of Quiltmaker's 100 Block Challenge Volume 14.
1 Comment

Magic Stars Quilt Pattern now available online from Connecting Threads

11/1/2016

0 Comments

 
Hi everyone! I’m excited to tell you that I have added a third pattern that is available for download from the Connecting Threads website. Click on the quilt image below for a link to the quilt pattern.
This design was originally published in the September/October 2014 Quiltmaker magazine. This version is different than what was published in the issue. I didn’t pick the fabrics for that quilt. Also the folks at Quiltmaker decided to change the placement of the values. So the resulting quilt didn’t reflect my original vision.
Picture
This quilt, made with various values of green and violet, is exactly what I envisioned. I was trying to achieve the illusion of transparency. To get the transparency that I desired I needed to use a couple of my favorite tools.
I used a color filtering tool and a grey scale value card. The first item helps you to see the value of the fabric represented in a neutral color, grey. This way you aren’t swayed by your emotions when you look at the fabric. The second tool helps you to attach a name or number to the value so that you can differentiate between it and other values of grey that may be close to it. The experience of making this quilt was improved by the use of these tools.

 I recently did a lecture and workshop for my guild. In the lecture, Quilter's Color Theory Muscle Building, I explained how to use these tools to improve your quilting experience. For the workshop I taught the techniques that I use, from start to finish, to make a quilt with matching seams and not a single triangle point cut cut off anywhere in the design. Both the lecture and the workshop went well, but I think that the workshop might need to be lengthened to a two day class.

Thanks for visiting my blog and leave a comment if you'd like. It just may take me a while. If you haven't recieved an answer to a comment you left on an earlier blog, please be patient with me. Happy New Year to everyone! Please stay safe!

0 Comments

New quilt Design "Spook-tacular" in Easy Quilts Magazine Fall 2016 from Fons & Porter

7/11/2016

1 Comment

 
I have exciting news to share with you. I have a new design in Fons & Porter’s Easy Quilts Fall 2016. Even more exciting, they are offering a kit for the design. I’ll tell you more about that in a little while. The name of the quilt pattern is Spook-tacular.
The fabric is from the Creepy Hollow collection by Quilting Treasures. It’s a fun group of fabrics featuring Halloween motifs in orange, purple, green and of course black. The group includes a panel of every Halloween related creature you could imagine; friendly ghosts, dapper pumpkins, dancing skeletons, big eyed spiders and smiling bats. I fell in love instantly and decided to try coming up with an appropriate design.
The construction for the final design is very basic. It utilizes two very traditional blocks; Shoo Fly and Monkey Wrench. These two blocks are alternated in a 4 x 5 block layout. These are surrounded by a beautiful border print. I used the remaining border print strips on the back of the quilt. I alternated the borders with a tonal fabric. I finished the ends with the tonal so that it would be trimmed off and not the lovely border.
One of my ideas was to use the border on two different tops or make one top the backing for the other. The border print only had two repeats across the width so I had to find a creative use for the remaining fabric borders.
Picture
Picture
I tried a couple of different ideas before sending them off to F&P to look at. They picked the one they liked best and the rest will live forever as a jpeg on my computer. But I’m going to show them to you first. I came up with one idea that utilized the panel and I tried another for the border print.
I hope you like it. If you make one, please send me a picture when you have the chance.
Happy Quilting!
1 Comment
<<Previous
Forward>>
    Picture
    Picture

    Janice  Averill
    West Haven, Connecticut, United states

    Welcome to my Blog! This is where I'll share my thoughts about quilting with you. I'll post pictures and talk about designing quilts and construction techniques. I'll also post things that inspire me. Please leave a comment and let me know that you came by for a visit..

    Categories

    All
    100 Block Challenge
    Color Theory
    Connecting Threads
    Contests
    Ct Piecmakers Raffle Quilt
    Electric-quilt-lessons
    Electric Quilt Software
    Fabric Dyeing
    Fons & Porter Magazine
    Free Patterns
    Guild Workshops
    McCall's Quilts
    New Quilt From An Old Favorite
    NQM BOM Round 3
    Published Designs
    Quilter's Gallery
    Quilting Treasures Designs
    Quilting With Jose
    Quiltmaker Magazine
    Random Quilt Adventures
    Video Appearance

    RSS Feed

    Picture

    Archives

    January 2021
    October 2018
    November 2017
    October 2017
    August 2017
    June 2017
    May 2017
    April 2017
    February 2017
    November 2016
    July 2016
    June 2016
    May 2016
    April 2016
    March 2016
    December 2015
    November 2015
    September 2015
    August 2015
    July 2015
    June 2015
    May 2015
    April 2015
    March 2015
    February 2015
    January 2015
    December 2014
    November 2014
    October 2014
    September 2014
    August 2014
    July 2014
    June 2014
    May 2014
    April 2014
    March 2014
    February 2014
    January 2014
    December 2013
    November 2013
    October 2013
    September 2013

    Picture
    Picture
    Picture
    Picture
    Picture
    Picture
    Picture
    Picture
    Picture
    Visit the shops below for kits, fabrics, notions, patterns & magazines or anything else you might
    need to make a quilt.
    Picture
    Picture
    Picture

Proudly powered by Weebly