N.Q.M. B.O.M. ROUND 3 - BLOCK 3
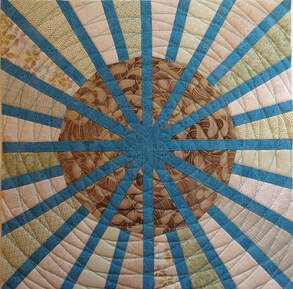
I can't believe that it's already March! That means we're on the third block for the National Quilt Museum block of the month Facebook group. In this blog I would like to share with you my thoughts about this block and how I decided to assemble it. Before we get started I'd like to show you my finished block. Tada!
My first thoughts when I saw this block was, wow that is gorgeous and dynamic and it looks like it'll be very challenging to sew. After perusing the directions that were provided I decided to forge my own path on how to construct this block. I used some of the information provided by the designer but I made some changes in the dimensions and the techniques that I would use to assemble it. I did this because it's what I knew I would be more comfortable. This may not work for you. You might be better off working with the directions given with the pattern. That being said if you are not an experienced quilter, then you will probably struggle with the pattern instructions because I did and I'm an experienced quilter.
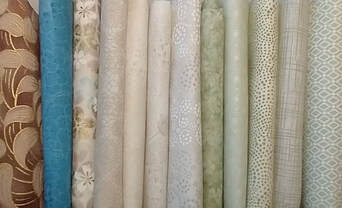
Before we get sewing, we have to pick out fabrics. I decided to continue using the blue fabric that I've used in the previous two blocks. I added in one of the coordinates from the collection that I had also used in the previous blocks. I added another print from that collection that I had not used yet. to create unity. I decided that since the blue fabric was a medium value I would make the background a light value. These are my fabric choices.
Before we get sewing, we have to pick out fabrics. I decided to continue using the blue fabric that I've used in the previous two blocks. I added in one of the coordinates from the collection that I had also used in the previous blocks. I added another print from that collection that I had not used yet. to create unity. I decided that since the blue fabric was a medium value I would make the background a light value. These are my fabric choices.
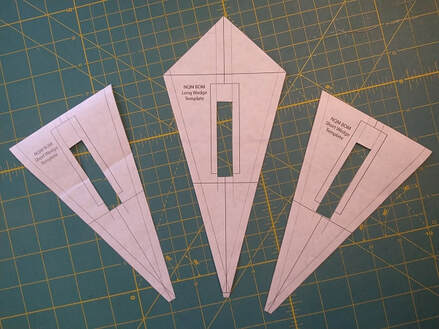
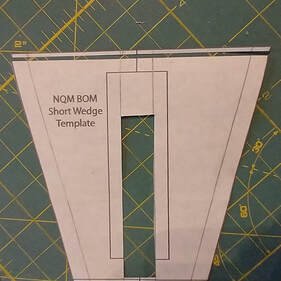
Now getting down to the construction of this block; the first thing I did was print these templates out on freezer paper. I then drew in the 1/4" seam lines on the long sides of each template. Next I drafted in a 1/2" window down the center line of each so that I could ensure that the strip on my assembled unit had the proper placement. Carefully use your scissors to open that window. I felt that the window that the designer gave us was too big to achieve the accuracy that I desired.
As I followed along on the Facebook group page, I saw one of the problems that folks were running into was that the center unit, which is cut at 3" by 4", would come up a little short once you stitched it and flipped it over. So I cut that unit at 3" by 4 1/8". That way when you stitch it and flip it over it covers the whole unit.
My next decision was to increase the width of all of the 1" wide strips to 1 1/8". This is a trick I learned from making many Seminole strip quilts. For any strip that is 1" or narrower, it is best to cut the strip 1/8" wider than needed. The idea is that after you sew the strip on one side, the remaining raw edge could be a little bit off from human error. This small amount of human error is not noticeable on wider strips but it can become obvious on narrower strips. If you trim the raw edge to the finished with plus a quarter inch seam, you will only have that human error variable on one side of the strip.
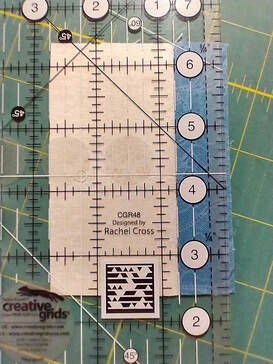
For example, on our project we are working with a half inch finished strip down the center of the unit so therefore once one side has been stitched down the visible amount of strip will be 3/4" wide when trimmed. Here's a picture to demonstrate.
My next decision was to increase the width of all of the 1" wide strips to 1 1/8". This is a trick I learned from making many Seminole strip quilts. For any strip that is 1" or narrower, it is best to cut the strip 1/8" wider than needed. The idea is that after you sew the strip on one side, the remaining raw edge could be a little bit off from human error. This small amount of human error is not noticeable on wider strips but it can become obvious on narrower strips. If you trim the raw edge to the finished with plus a quarter inch seam, you will only have that human error variable on one side of the strip.
For example, on our project we are working with a half inch finished strip down the center of the unit so therefore once one side has been stitched down the visible amount of strip will be 3/4" wide when trimmed. Here's a picture to demonstrate.
After all of the three strip subunits have been constructed, I proceeded to attach them to the freezer paper templates that I created using my iron. The wrong side of the unit goes to the shiny side of the freezer paper template. Use the half inch window to make sure that your unit is aligned properly. The top of the template should line up with the raw edge of the unit. You might have less than a 1/4" seam at the bottom but that should not be a problem.
Here's a little tip I will give you about working with freezer paper, take a sticky lint brush to your ironing board cover to remove any lint before proceeding. Also when you touch the iron to the freezer paper, try to only heat up the parts that are attaching to your fabric units. I have had experiences in the past where the wax picked up so much lint from my ironing board that it didn't want to stick to the fabric piece that it should stick to.
Here's a little tip I will give you about working with freezer paper, take a sticky lint brush to your ironing board cover to remove any lint before proceeding. Also when you touch the iron to the freezer paper, try to only heat up the parts that are attaching to your fabric units. I have had experiences in the past where the wax picked up so much lint from my ironing board that it didn't want to stick to the fabric piece that it should stick to.
Now sew center rectangle to these units sewing on the seam line. Don’t forget to shorten up your stitch length when you're doing foundation piecing. It shouldn't be too so small that you can't get the tip of your seam ripper under it but it should not be your normal stitch length for piecing. You need it to perforate the paper so that it tears off easily. When you are don, you need to trim off the extra fabric on the long sides of each unit even with the edge of the paper.
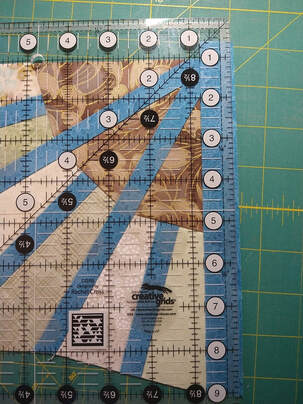
This is where I veer off from the instructions given by the designer. Instead of sewing the 10-in long strips to one side of each short wedge unit, I sewed both strips to the long wedge unit. Another tip that I will give you is whenever possible so towards the point not away from it. Attach one 10" strip to one side of the long wedge unit, press it away from the unit and then trim the extra that continues past the point off so that it is a continuation of the other long side of the long wedge unit as shown in this picture below.
Now so the second strip to the long wedge unit, from the outside edge towards the point. Press that out also and then use your ruler to trim each strip to be 3/4" wide. you won't see a lot come off but just remember that however much you were off on this side you will probably be off on the other side which means that that would be doubled.
This is the part that's really important if you want to have the center triangles be aligned perfectly. Trim the tops of the strips to be a continuation of the top edge of the corner unit template as shown in the picture below.
If you're a person who can notice when something is off by a 1/6" then I recommend that you trim a 1/16" off of the short wedge template top.
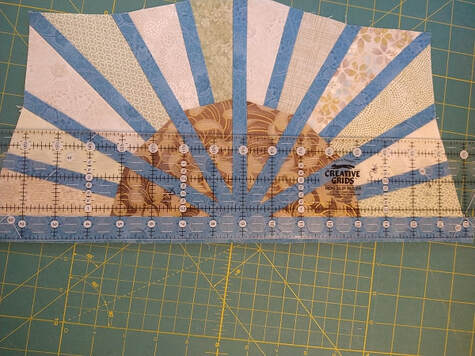
Now it's time to join the short wedge units to the long wedge unit. To do this accurately you would line up the outside edge where the quarter inch seam meets the edge of the strip. Here are a couple of pictures, from the front and back, to show you what I mean. If you sew the short wedges to the long wedge in this fashion then the center element will result in all of the edge of the center element being even. Once you're done sewing those seams press the short wedge units away from the strip. Here’s a front and back view of what that looks like.
I pressed all of my seams underneath my narrow strips because the value of my strips was darker than the neighboring unit. If your strips are a lighter value than the neighboring unit you might want to press the seams away from the narrow strips
Now that you have a quadrant completed, you need to check that the two sides adjacent to the center corner are at 90° to each other. Lay your rotary ruler on top of the unit and if it has a diagonal line, place that line along the center of the middle strip. Slide the ruler towards or away from the center corner until it is even with the two adjacent sides of your quadrant and trim. If you do this now you will not end up with a witch's hat. You can lay your units out and see if they meet perfectly as shown in this picture below.
When you are sure that all of your quadrants are at a perfect 90° angle you can sew the 8 1/2" strips to one side of a quadrant. Once you have done this and pressed the strip away from the quadrant you will again trim that strip to 3/4" wide. Repeat this with one more quadrant on the opposite side of the block. Once you are done with that, sew two quadrants to together and press the same open.
Wow look at you you're almost finished! Now so the long strip to one half of your block. Press that away from the half of the block and trim it to three quarters in wide.
Now so the other half of your block to that strip and voila you are done!
Thank you for reading my blog. I hope that this information is useful and if not I hope that, at the least, you are entertained by this peak inside of how my brain operates. Have a great day folks! Happy quilting!

 RSS Feed